|
|
Tasking Manager
If the user interface of the version you use looks different from the one described here then you should consult our version overview Section Index
The HOT Tasking Manager, http://tasks.hotosm.org/, is an intuitive tool that mappers can use to sort an area into a grid, and work together to map an area in an organized way. This allows mappers throughout the world to assist in mapping a defined region with a minimum risk of overlapping work areas, and also allows people both on the ground and working remotely (also sometimes referred to as “armchair mappers”) to collaborate effectively, rapidly, and avoid accidental rework being required due to conflicts. Overview of the process
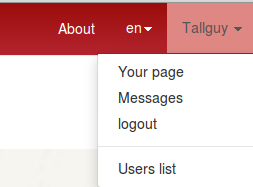
Options & linksThe Task Manager initially displays in English - to change to another language click on English in the red header banner. For information about the Tasking Manager, HOT sponsors, partners & help click on About at the top of the page. Once you have logged in, you may click on your username at the top. Here you can:
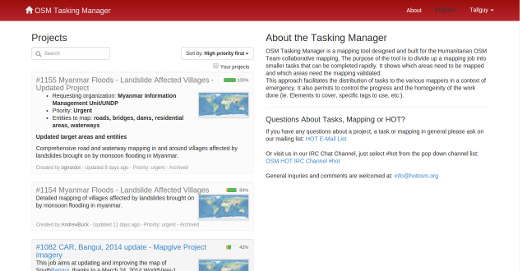
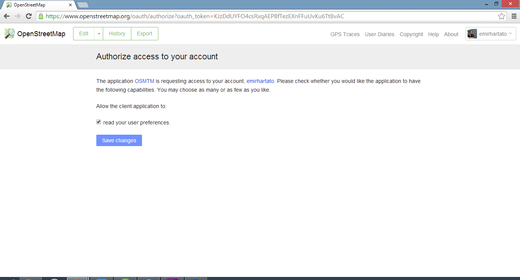
Getting started with the Tasking ManagerYou may view projects as a visitor, but to actively participate you must be logged into the Tasking Manager - use your OpenStreetMap account username & password. Open your Internet browser and go to http://tasks.hotosm.org. You will see a page like this:
Locating a projectThe current list of projects may be sorted according to:
You can further refine your list by clicking in the Your Projects box, to see just the projects in which you have participated, whether you have completed a square or not. Validators will also find projects they have contributed validated squares in, by using this checkbox. You may use a free text search to locate projects that contain particular text strings, such as Ebola (search is not case sensitive). Projects are frequently referred to by their Project number, e.g., #711 - Ebola Outbreak, Kayes, Mali - Pre-emptive building mapping, and in this instance you could search on #711 to find this project. Click on a blue project title to see more information about that project.
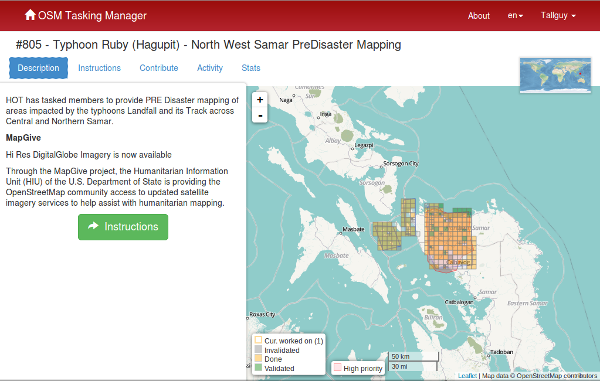
DescriptionEverything you need to know about the project is here! On the left is a description of the mapping project and what is required. On the right side is a grid showing the area to be mapped;
Instructions tabThis shows what is required in the mapping task. Tasks range in difficulty, suitable for beginners, intermediate and advanced mappers - and the instructions will explain this. Make sure you read and understand this section. There are many styles of mapping project, for many different purposes. Some common project activities include:
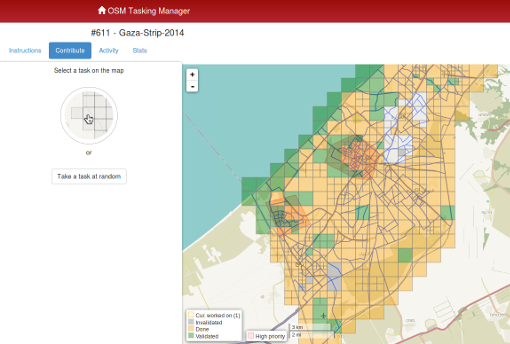
Not all areas of the world are similar to your own, so specific tagging advice may be provided. For example, Africa’s road network is very different to typical American or European highway systems. There will be a section indicating the Changeset comment you should make sure appears in your editing programme when uploading/saving your changes, together with the source information you may (depending on your editing software) need to copy & paste to the source field on making changes. Sometimes, task specific imagery may be available - you may need to agree to a license in order to access it. Instructions usually will indicate the easiest way to load this into editors such as JOSM or iD. When checking a square marked as complete, validators will expect that the requirements from the instructions tab have all been completed. You may find completing an entire tile is quite difficult - guidance below is available around unlocking tiles; as well as providing useful feedback for the next mapper. Activity tabThis shows activity that has taken place within the task in chronological order. Stats tabThis contains a graph of progress & other information. The Stats tab also contains a list of mappers who have completed at least one square within the project - to see which squares they have completed, you can hover your mouse cursor over a username, and the squares they have completed will become the only ones visible (use this to locate the squares you have previously completed). Once you have located the square by hovering your mouse over the user name, you may click on the square to see the comments that have been left by mappers and validators for the square, which is a useful way of obtaining feedback from validators. Contribute tabClick when you are ready to start mapping. You may choose your square to work on by selecting it from the map, or by clicking on the “Take a Task at random” option.
Selecting a square to map
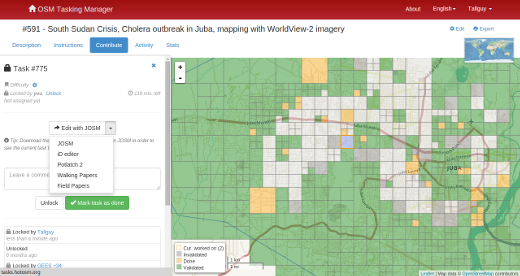
Having selected your square you will be able to see if there is any history for this square, such as a mapper starting to map, but realizing they do not have time to complete the square. If you accidentally select a square, you can release it again by clicking on the blue close control - x - shown in the screenshot above. Clicking on the Start Mapping button locks the square so that no other mapper can select it until it is released again, and starts a 2 hour (120 minute) countdown timer, at the end of which time the square is automatically released. It is good practice to check on your countdown timer on a regular basis - it is easy to become engrossed in your mapping and not realise your square has been released, and has now been selected by another mapper who has started mapping it too. This can lead to conflicts and problems. Editing choicesDifferent options for editing are presented to you as soon as you lock a square.
Edit with JOSMStart JOSM before using this link and it will automatically load the existing OSM data into JOSM.
iD editorSelect this to automatically start a new tab or window of your web browser, with existing OSM data loaded. The Internet Explorer web browser does not currently support iD and it will load Potlatch 2 instead. Your original tab or window with the Task Manager will still be present. Potlatch 2Editor will load in a new window or tab. Potlatch will not automatically display the task bounding box, but you can do so by following this procedure:
Walking Papers / Field PapersFor use only when you are involved in a project where a local mapper has carried out a ground survey and marked a printed map with information such as road names. This map can be rescanned & used as a background image for a remote or local mapper to read the information & update the OpenStreeetMap data Field papers section of LearnOSM. Splitting a squareHaving selected your square and inspected it with the imagery in place, you may realise that there is far too much detail required for mapping. An example of this may be tracing buildings in dense urban areas, or locating small villages in large areas. As guidance, where it isn’t possible for one person to complete within the 2 hour time limit you can often split the task into 4 smaller areas. Use with caution - if/when squares are split too small it is difficult to judge what type of highway is involved, and to identify other features.
Unlocking a square before it is completeIf you start working on a square, but cannot complete it for some reason, it is best practice to leave a comment against the square. Simply detail what remains and choose unlock. Make sure your comments are relevant and aimed to help out the next mapper. For example: Finishing a squareIt is very difficult to be completely certain that you have completed a square - however it is acceptable to mark the square as complete if you are fairly sure - the contents will be checked by another mapper when validating, and any small additions can be made then. For the process to work most effectively, mappers need to mark squares as complete rather than leaving them for several other ‘not sure’ mappers to spend time also checking them. When you have finished editing and think that the square is complete, save any remaining edits with your editing programme, then return to the Tasking Manager.
Sending a message from the comment boxWhen leaving a comment against a square, you can have the comment sent as a message to a named mapper. Much like Twitter, simply use an @ followed by the username. This will send a message to the user containing the comments from this box, plus a link to the square that the comments box relates to. For example: This is particularly useful when validating or adding on another’s previous work - you can provide feedback, thanks or more.
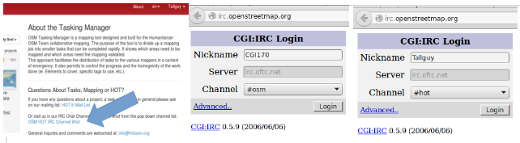
Referring to a particular square when sending an emailIf you need to send a message, such as an email or an IRC message, and you are querying something concerning a particular square within a project (perhaps you need help identifying something from the satellite imagery):
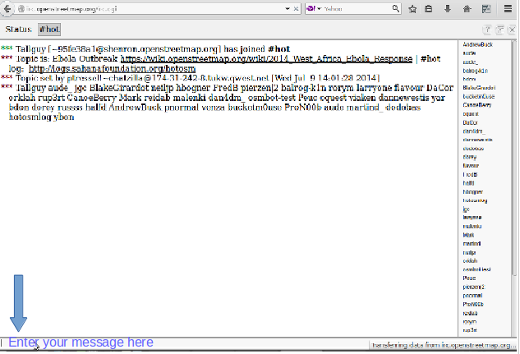
Getting live help
From the tasking manager;
Editing hints and tipsBy now you have a good understanding of what the Tasking Manager is, and some of the various functions it supports. Unlike normal editing, this tool is often used for time critical projects with many participants - this may be a little bit different to what you are used to. Some general advice to heed when working in this tool:
Was this chapter helpful?
Let us know and help us improve the guides!
|