|
|
OsmAnd
This guide refers to an early version of OsmAnd - please refer to the OsmAnd 2 version of the guide - this is retained purely for those users who have older versions of the App. OsmAnd (OSM Automated Navigation Directions) is an open source mapping and navigation application which uses OpenStreetMap (OSM) data for both online and offline use. It also includes a routing and navigation feature, with visual and voice guidance.
User Interface
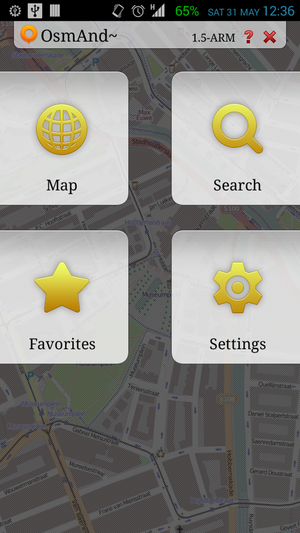
Main screenOsmAnd’s Main screen is divided into four buttons. The Map button brings up the mapping and navigation screen. The Search button will allow you to search for features, including POIs, Addresses, Coordinates, recent history and transport-related POIs. The Favorites will have your list of POIs tagged as favorite. The Settings button will have the options for configuring your OsmAnd installation further. Map Screen
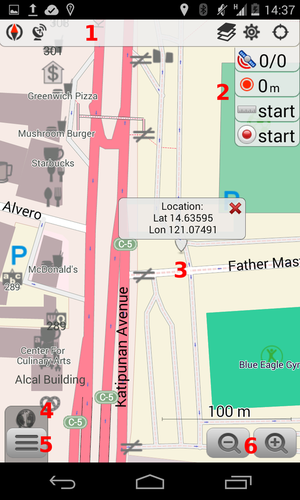
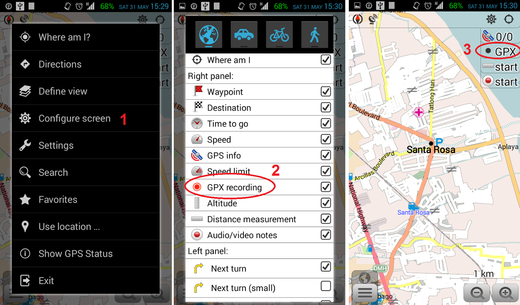
The Status bar (1) shows various icons: Compass, Logging services, View Definition, Screen Configuration, Location information. You may add or remove icons from the Status bar by calling the Configure Screen configuration under Menu (5). The panel on the right (2) displays the following widgets: GPS information (satellite icon), GPX recording status, Distance measurement, and Audio/Video notes. The main canvass displays a map of the area of interest. A long press on the canvas will open a dialog box (3) that shows the geographic coordinates. Pressing this dialog box will open a Contextual menu, discussed in the next section. You can zoom in or out (6) of the canvass to display more or less of area of interest. Contextual Menus
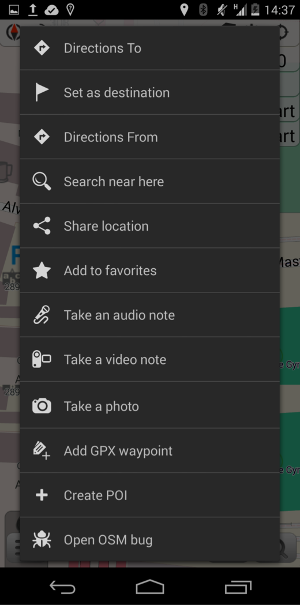
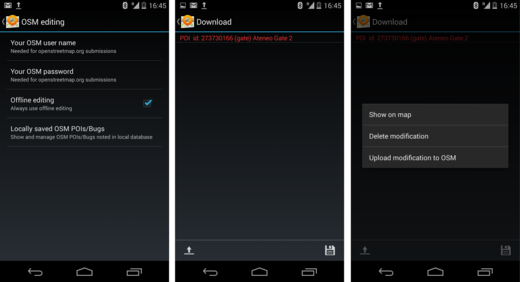
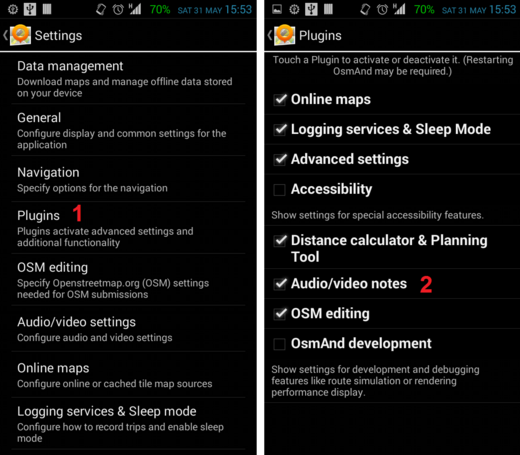
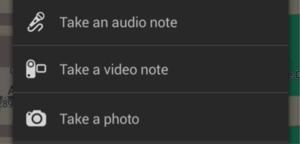
The Contextual Menu displays additional options related to a specific geographic coordinate activate from a long press (see previous section.) Directions To, Set as Destination, Directions From, and Add a GPX waypoint are options related to navigating routes. Search near here provides for localized search, limited to POIs available in the installed database. Select Add to favorites to mark frequently used POIs. Take an audio note, Take a video note, and Take a photo are multimedia capture options. To add a new POI directly to OpenStreetMap in the selected coordinates, select Create POI. Use Open OSM Bug for notations like bug reports, or to leave a comment for other mappers working in the same area. ConfigurationTo add the ability to add or edit data from OpenStreetMap, you must configure OsmAnd with your OpenStreetMap credentials: From the main screen, go to Settings > Plugins > activate OSM Editing Plugin. After that go to Settings > OSM editing. Add your username and password. If these credentials are not set, the user can only report bugs. Although the user interface includes this option to “report bugs”, it’s only created as a note on the OpenStreetMap website. After the installation, OsmAnd is ready to work offline, however, you have to download one (or more) offline maps for your location.
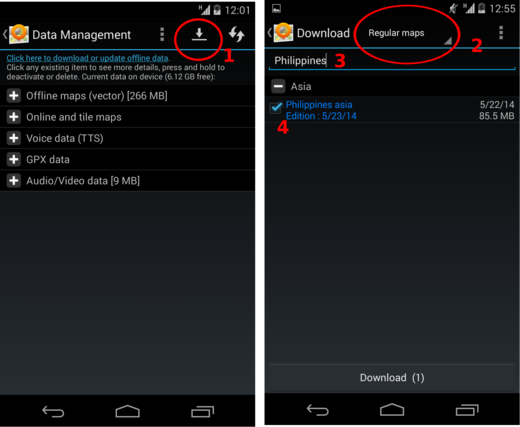
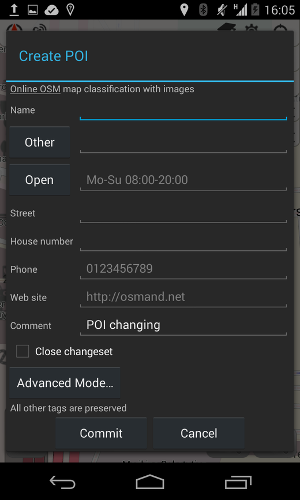
Go to Settings > Data management and press the download icon (1) which will bring you to the download screen. You can choose from Regular maps (2) or Roads-only maps (for low-powered devices, with limited storage spaces, or for simple navigation). In the filter field, type in your country or area of interest and it will display a list of matching data available for download. Click on the check box of the item that matches your requirement (4) and press the “Download” button at the bottom of the screen. Logging IntervalsThe Logging interval option under Menu > Settings > Logging services & Sleep mode is where the logging precision of your GPS track is set. The available option range from 1 second up to 5 minutes. Your selected profile (Vehicle, Bike, Pedestrian) will have different default values (2-, 5-, 10-seconds respectively). Logging precision affects battery life and data accuracy. Online Data Collection (with mobile data)Create a POILong press on a location to display the coordinates for a given point, then click on the popup to display the context menu. Select Create POI to add a new feature, along with the tags. Add the POI’s field information: name, and a commit comment explaining the feature you’re adding. In Advanced mode, more tags can be added. When done, select Commit.
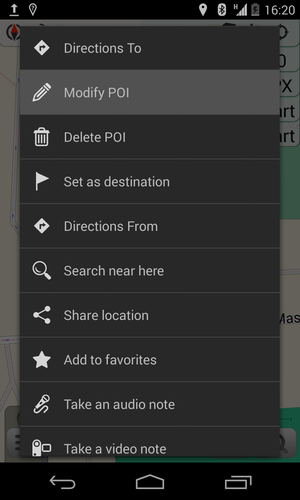
Modify or Delete POIsFirst, make sure to enable the POIs by going to Layers > POI and select Any. Now you should see your POIs with orange circles over them. By long pressing on a POI you will see two options from the context menu: Modify POI for editing, and Delete POI. A window will appear where you can update the POI fields, as necessary. It’s a good idea to add a comment or commit notes when modifying POIs.
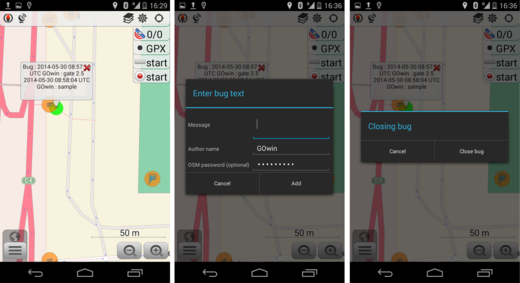
If you choose to delete a POI, a confirmation window will appear asking you to enter a comment or commit notes. Notes: Commenting, Adding and ClosingIf an Internet connection is available, it is also possible to close Bugs (Notes), or add comments to it.
Offline Data Collection (without mobile data connection)This is if you plan to collect data off-the-grid, without an active mobile data connection. Head back to the main screen, go to Settings > OSM Editing, and enable the Offline editing option by ticking the checkbox beside it. Changes you make offline will remain in your device until you connect to the Internet. You can manage the data you have collected from Settings > OSM Editing and select the Locally saved OSM POIs/Bugs option. The data listed in this screen is color coded. Green is for new or modified POIs, and red is for POIs you’ve marked for deletion.
From here, you may opt to upload the data to OSM or save these changes locally, in your device. Collecting GPX tracksBefore you start collecting GPX tracks, verify if Logging services & Sleep mode is enabled under Settings > Plugins.
To enable the GPX recording widget on the mapping interface, go to configure screen (1) and tick the check box for the GPX recording (2) option under the Right panel section. This widget is useful for starting and stopping track logging (3) (i.e. while taking a photo or notes of where you are)
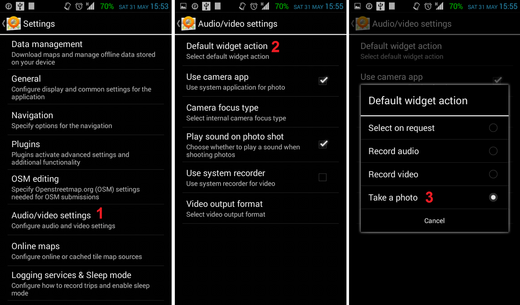
To capture Audio or Video notes conveniently from the main screen, enable Audio/video notes option from the under Settings > Plugins (1) then go to the configuration screen and check on the Audio/video notes (2) tick box. If you take photos often, instead of video or audio notes, change the default action for the Audio/Video widget. Go to Settings > Audio/video settings (1) > Default widget action (2) and select Take a photo (3).
Collecting Photos, Videos or Audio notes.To capture a photo (or video, or audio note) of a particular feature, press and hold over the location on the map, then press the pop-up dialog that comes up and select an action: take an audio note, take a video note, take a photo, or select other appropriate options from the context menu.
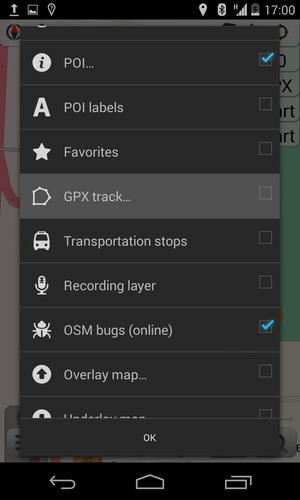
Displaying GPX tracksTo display the GPX tracks, go to Menu > Define View and enable the GPX track… option. This will display a list of options including the current track you may be recording, or other GPX tracks you’ve previously recorded or stored in your device’s OsmAnd folder. Showing GPX tracks on the canvass is useful for keeping track of your progress while on the field , and to check whether there’s anything you’ve missed along the way.
Exporting GPX tracks to OpenStreetMap editorWhen you’re done collecting field data, you can import your GPX tracks for use in JOSM (or another OpenStreetMap editor, including iD). Connect your Android device to a computer and copy the GPX tracks and multimedia files you’ve captured. In your device storage, look for the GPX track under folder /osmand/tracks, and the multimedia files /osmand/avnotes. For instructions on how to use the GPX track, along with the multimedia files in JOSM see the section Open in JOSM. For iD editor users, see the section Configuring the Background Layer. For other OpenStreetMap editors, please refer to your software’s documentation. SummaryGood work! You could now make use of a smartphone for collecting field data that you can add in OpenStreetMap, as an alternative to dedicated GPS receivers. The wide availability of smartphones with GPS (and/or GLONASS) open new opportunities for collecting and updating OpenStreetMap data by casual mappers. Take some time to practice and familiarize yourself with the app before working with live data. This section introduced the concept of collecting GPX tracks, modifying or deleting POIs, including adding, commenting or closing Notes/Bugs using OsmAnd. Moving GPX tracks and related data for use in another editor was also discussed.
Was this chapter helpful?
Let us know and help us improve the guides!
|