|
|
Editing Field Data
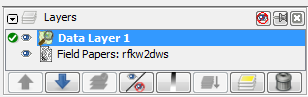
We’ve now covered all the building blocks of mapping with OpenStreetMap. In the Mapping with a Smartphone, GPS or Paper section you can see how to use mobile tools to survey an area. In this chapter we’ll return once again to JOSM and look at a couple of new concepts which we have not covered thus far. JOSM LayersIf you’ve followed along so far, you may have noticed that we can add all sorts of different things into JOSM. We can download OSM data, add Bing satellite imagery, load GPS tracks and waypoints, and add Field Papers - all of which are displayed in the map window of JOSM. You may have also noticed that every time you add something new to JOSM, an additional item is added to the Layers panel on the right side of JOSM. Depending on what you have opened, your Layers panel may look something like this:
Each item in this list represents a different source of data that you have open in your map window. In this example, “Data Layer 1” is the OpenStreetMap data that we are editng. “Field Papers” is the layer created when we added our Field Paper into JOSM. If you add the Bing satellite imagery, a new layer will appear in the Layers panel named “Bing aerial imagery” The idea of layers can often be hard to understand. A good way to imagine it is that each layer is like a semi-transparent piece of paper, and they are all stacked on top of one another. Each piece of paper has a certain type of information on it, and they can be rearranged any way you like. Layers that are used as references, such as satellite imagery, GPS tracks, and Field Papers are often called “base layers.” The OSM data layer is the layer that you actually work with.
Using GPS Data and Field PapersIn the Mapping with a Smartphone, GPS or Paper chapters we saw how to collect data with a GPS and Field Papers, and how to load it into JOSM as a layer. Once you have surveyed with one of these tools, you still need to add the information into OpenStreetMap digitally. You do this with the same process you learned previously - download, edit, save. The difference is that instead of using only satellite imagery as a base layer, you can also use your GPS data, Field Papers, notes, or a combination of them all.
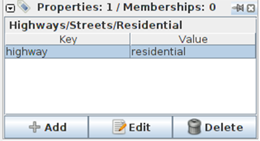
TagsWhen you draw a point, line, or shape, it has a location, but no information about what it is. In other words, we know where it is, but not what it is. Before now, we have been using items from the Presets menu to define what it is. The way OpenStreetMap knows what an object is is by using tags. A tag is like a label that you can put on something. For example, if we draw a square, it’s only a square. But then we add attributes to it that describe what it is: this square is a building; the name of the building is “Menara Thamrin”; the building is 16 levels high. You can add as many tags as you want to an object. Tags are saved as pairs of text, called keys and the values. In OpenStreetMap, the tags written above would in fact be:
If you select an object in JOSM, you can see all the tags that are attached to it in the Properties panel on the right.
Editing TagsYou can add, edit, and delete tags from the Properties panel. However, the tags are traditionally in English and can sometimes be confusing, so it is often easier to use the Presets menu. When you add or change tags, the attributes of the object are changed.
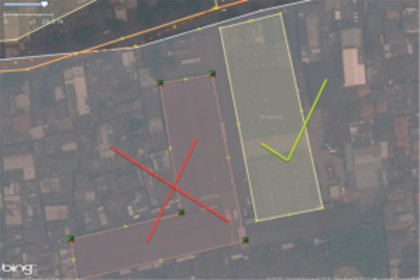
Common Mistake: Tagging nodes when you want to tag lines or polygonsWhen you are editing the attributes of a point, you will first select the point and then add tags either through the Presets menu or directly in the Properties panel. A common mistake is when adding attributes to a line or a shape. When selecting the object, it is important that you select the line, and NOT the points that make up the line. This frequently occurs because editors use the JOSM select tool to draw a box around an object, which causes everything, both the line and the nodes to be selected, and when you add tags they are applied to the nodes as well. Be sure to only select lines when you want to add tags to them.
Saving OSM filesWhen you are editing in JOSM, it is always a good idea to download, edit, and upload changes in a reasonably short period of time. You do not want to download data one day, and then wait until a few days later to upload your edits. What if someone else edits the same area during that time? This will cause errors and conflicts. Don’t be afraid to upload your edits frequently. This ensures that your changes will be saved to the database and you will not lose your hard work. If you are working in a single area, it’s a good idea to download the map data every time you want to edit, in case another user has made changes. Although you should always try to download OSM data when you are ready to edit, and upload your changes frequently, there may be cases in which you want to save the OSM data on your computer. For example, if you have intermittent connectivity to the internet, you may wish to download data, save it, edit, and then upload your changes later on.
SummaryIn this chapter we looked a little bit closer at the JOSM interface and learned about layers and tags. You should now have a solid footing in how to map and how to edit OpenStreetMap.
Was this chapter helpful?
Let us know and help us improve the guides!
|