JOSM - Adding Aerial Imagery
Reviewed 2016-09-09
Not all aerial imagery is within the JOSM imagery menu, but it is easy to add if you have been given the link information.
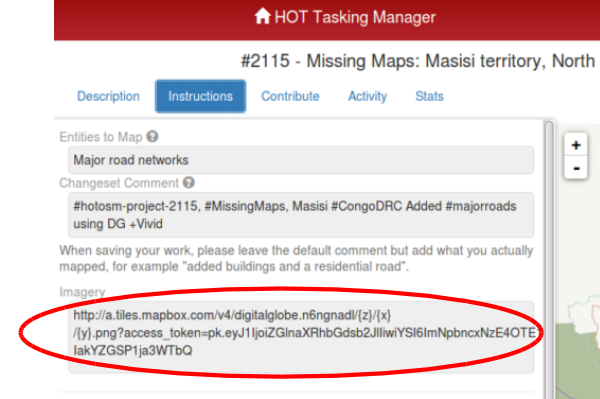
In this example we are working from the HOT Tasking Manager and the imagery required to complete one of the projects needs to be manually added to JOSM. The principle of adding the image link is the same whatever the editing you are working on, as long as you are provided with the link. There are also occasions when the intended links do not work as expected and it may be necessary to add the imagery manually, if you can obtain the link information.
From the Tasking Manager information tab, or your other source of the information, copy all of the Imagery section.
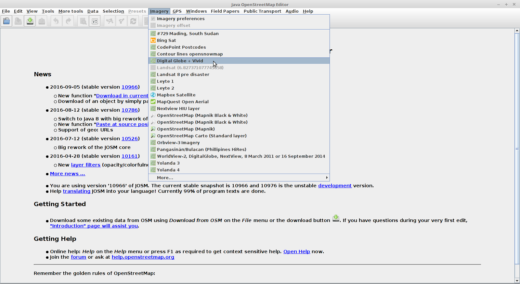
Go to the Preferences menu of JOSM (Edit / Preferences, or on an Apple machine JOSM / Preferences) and select the imagery tab

Then click on the  icon.
icon.
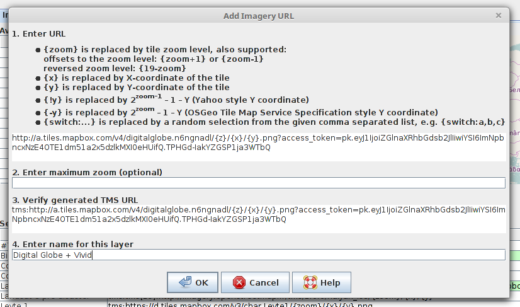
TMS URLs usually have {x}{y} and {z} in them, WMS URLs are typically very long and have {width} and {height}, WMTS URLs usually have WMTSCapabilities.xml in them. If you are not sure what type of imagery URL you have, you can try adding them as different types to see which one works.

Box 1. Paste the information you copied from the Tasking Manager information tab into the first box on the window. JOSM will verify it, and if it is correct the verification process will repeat the information in box 3 (see below). If it does not appear in box 3 within a few seconds, check that you have not accidentally missed letters, or accidentally added ‘white space’ at the beginning or end - just the actual link must be copied and pasted.
Box 2. This is normally left blank, unless you have received any other instructions.
Box 3. now contains a duplicate copy of Box 1, generated by the verification process within JOSM.
Box 4. Enter a name for the layer - as my imagery was identified in the Tasking Manager as “Satellite imagery for this project is kindly provided by Digital Globe through their +Vivid service.” I have named my layer “Digital Globe + Vivid”.
Click on the  button, and the imagery you have added will appear at the bottom of the list - you may have to scroll down to locate it.

Click the button to close the preferences window and return to JOSM. When you need to use the imagery, click on the word Imagery in the menu at the top of the screen and select it from the alphabetical list. Alternatively Alt + I should show the imagery menu (These shortcuts may vary according to the language setting).
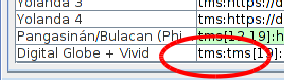
Tip If the imagery fails to load, check how the imagery appears in the list. In this example, tms appears twice. You can edit the link within josm so that it only appears once, which will probably correct the problem.
Adding a WMS Server
Adding a WMS server is very similar to adding a TMS server, with one important difference. WMS servers typically provide more than one imagery layer to choose from and you must either select a layer when adding the WMS server in the preferences, or specify that you will select a layer to use whenever you select the server from the Imagery menu in the main JOSM interface.
To add a WMS server open the JOSM imagery preferences dialog as shown above, but this time click on the “Add WMS” button 
The resulting dialog box will look like the one below:
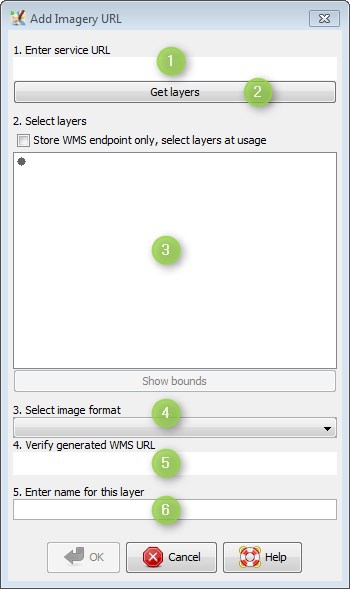
Box 1. Enter the URL of the WMS Server in this field. This should just be a typical URL that starts with http or https
Button 2. After entering the URL click the “Get Layers” button. JOSM will contact the WMS server and get a list of layers available from that server
Box 3. This is where the list of available layers will be displayed. There can be folders that need to be expanded to see the layers available
Pop-down Menu 4. Image Format - this will usually be automatically selected after you click on one of the layers in Box 3 it may offer more than one type of image format, but generally jpeg or png is the format.
Box 5. This is auto generated after you select a layer in Box 3. It will be long and complicated, usually it is just fine and is more informational and typically should not be edited.
Box 6. Enter a name for the server or layer. A default name will be filled in based on the URL, but you can enter a more meaningful name. This is the name that will appear in the JOSM Imagery menu when you want to add the layer to your layers panel in the regular JOSM interface.
Example WMS server with a lot of interesting layers: http://sedac.ciesin.columbia.edu/geoserver/wms

Make sure you actually click on a layer if you would like to have the Imagery menu item always load the same layer. In the above example, when the layer is selected from the Imagery Menu, it will always load the “World Database of Protected Areas” layer.
If you would like to choose which layer to load each time you select the server from the Imagery Menu and be able to load multiple layers from the same server easily, just check to box that says “Store WMS endpoint only”. That will also disable selecting a layer and the verify URL field.

Click on the button, and the imagery you have added will appear at the bottom of the list - you may have to scroll down to locate it.
Click the button to close the preferences window and return to JOSM. When you need to use the imagery, click on the word Imagery in the menu at the top of the screen and select it from the alphabetical list. Alternatively Alt + I should show the imagery menu (These shortcuts may vary according to the language setting).
