|
|
JOSM Editing Tools
In the starting to use JOSM guide we cover the basics of drawing in JOSM, but there are many tools and techniques which are not demonstrated. Here we will look at some of the basic tools and techniques available for drawing map features in JOSM, and in the following chapters we will look in more depth at advanced drawing tools. Get the Sample File
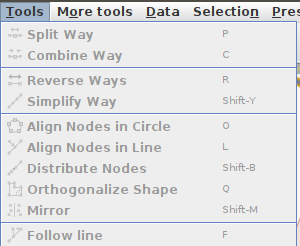
Drawing toolsIf you click on the “Tools” menu at the top of JOSM, you will see that there are numerous functions which can aid you in drawing lines and shapes, and editing the objects on the map. JOSM has some additional tools to make it easier to draw lines and shapes. These tools are found in the “Tools” menu at the top of JOSM.
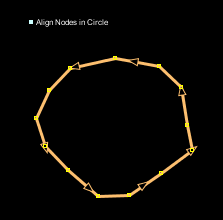
In order to apply the functions in this menu, you must first select a point, line or shape in the map window. The sample file contains various elements that are labelled with the names of different tools on the menu. Aligning nodes in a circle
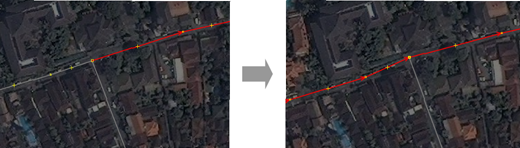
Experiment with each of the tools using this sample file. A description of some of the tools is provided below. Split WayThis allows you to divide a line into two separate lines. This is useful if you want to add different attributes to different parts of a road, such as a bridge. To use this function, select a point in the middle of the line that you want to split, select Split Way from the Tools menu, and your line should be split in two. Combine WayThis does the opposite of Split Way. To combine two lines into a single line, they must share a single point. To use this function, select both lines that you want to combine. You can select more than one object by holding the SHIFT key on your keyboard and clicking on each line. When you have selected both lines, select Combine Way from the Tools menu.
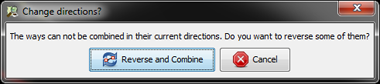
Reverse and CombineIf you are combining roads that have different directions, you might get this warning:
If the roads are connected and go in the same direction, then choose “Reverse and Combine.” Reverse WayThis will change the direction of the line. All lines in OSM have a direction, which is shown in JOSM by the arrows on the line. Direction doesn’t usually matter, except in the case of one way roads and rivers that flow in a certain direction. In these cases you may need to reverse the way so that it goes in the correct direction.
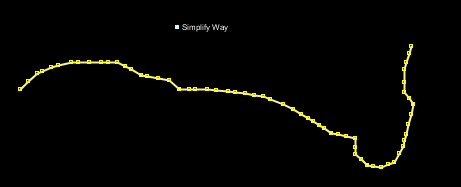
Simplify WayIf your line has too many points in it and you’d like to make it simpler, this will remove some of the points from a line.
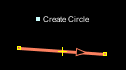
Create a CircleUse this tool, which will create a more perfect circle. Draw a line which represents the diameter of your circle, and then apply this tool.
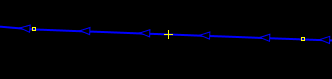
Align Nodes in LineThis function will align a series of points into a straight line. With long lines it is best to select sections of the line to straighten. Be careful as this does have the tendency to shift the line a little bit.
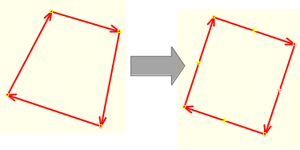
Orthogonalize ShapeThis function is very useful for drawing regular shapes such as buildings (But see also JOSM building tools). After you draw an area, this function will reshape it to have square corners.
Unglue wayThis tool allows you to detach nodes that are connected. It is useful when two object share a node when they should not. For example, a common mistake is for a road to share a node with the corner of a building. Of course roads don’t run into buildings usually, so this is a mistake, and you can unglue the objects from one another.
The line and node will not actually appear separate until you move them. Keyboard ShortcutsOnce you start editing a lot you will realize that you waste a lot of time clicking on menus and submenus. To overcome this, JOSM has keyboard shortcuts for just about everything. This means that instead of clicking an object and then going through a lengthy menu process, you can simply select the object and press a key on your keyboard. All of the tools mentioned in the previous section have shortcut keys, which are listed on the Tools menu to the right of each tool name. For example, “O” is the shortcut key to align nodes in a circle. “L” is the shortcut to align them in a line. It can take some time to learn the shortcut keys, but you will find that it saves a lot of time in the long run. Here are other shortcut keys (in bold) which are some of the most important.
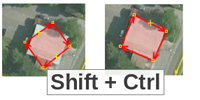
Scale and RotateA common question is how to rotate a line or shape after it has been drawn. To rotate an object, first select it. Hold SHIFT+CTRL on your keyboard. Click and drag the mouse to rotate.
To scale an object (make it bigger or smaller), follow the same process, but hold ALT+CTRL instead. These instructions are displayed on the information bar at the bottom of JOSM:
Was this chapter helpful?
Let us know and help us improve the guides!
|