|
| |||||||||||||||||||||||||||||||||||||||
Editing the WikiIntroductionOpenStreetMap is based around a community of mappers working together. Because of this it is necessary to have a way to communicate with each other– whether it be to organize social mapping events, to discuss different projects related to OSM and/or to create standards for mapping processes. The key avenue for mappers to do this is through the OpenStreetMap wiki, a website where users can create different web pages about different topics and in different languages. To see the OSM wiki, visit https://wiki.openstreetmap.org A wiki is a website where any user can add pages and edit existing pages. It is based on the same principle as OpenStreetMap- the only difference is that with OSM users are editing maps, while wiki users are editing text. The most famous wiki is Wikipedia (https://www.wikipedia.org), an online encyclopedia that covers almost every topic imaginable. The OpenStreetMap wiki contains information about everything related to OSM. When someone is working on a project that uses OSM, they create a wiki page so that other people can read about their project. The wiki contains help for users wanting to learn more about OSM, for common standards on how to make maps and on how to tag objects on the map, as well as many other OSM things. You have already seen at least one of the OSM wiki pages, which describes all of the most common features that you can add to the map, and how they are commonly tagged. This is the Map Features page: https://wiki.openstreetmap.org/wiki/Map_Features In this chapter we will learn how to add and edit pages on the OSM wiki. We will learn the guidlines for contributing, the special markup language for creating a wiki page, and helpful ways for improving the wiki, such as translating important pages. The Wiki and Signing Up
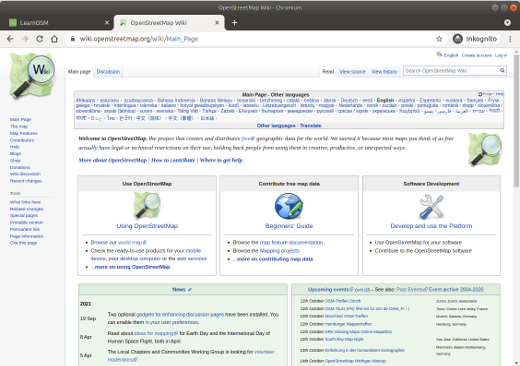
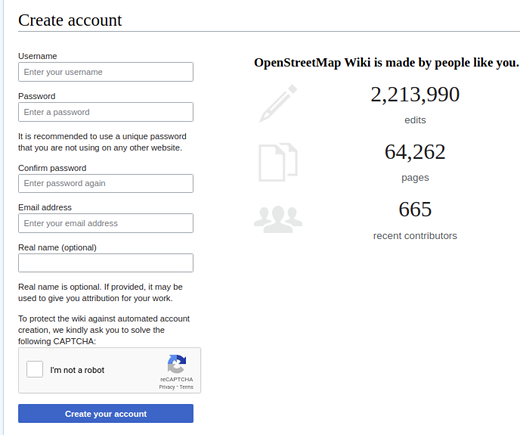
Go to https://wiki.openstreetmap.org to see the main wiki page. You’ll see a lot of things here, and many links to other pages on the wiki. In the left column are links to some of the main pages. At the top of the page are a list of all the languages in which you can view this page. If it’s available, you can switch the page to your language. Try exploring some of the links on the page and see the kind of information available on the wiki. You don’t need to have an account in order to view the OSM wiki, but you will need to create an account if you want to edit or add pages. Note that this is not the same as your OpenStreetMap account. You need to create a new account, although you can use the same name on the wiki as you did when signing up for OpenStreetMap.
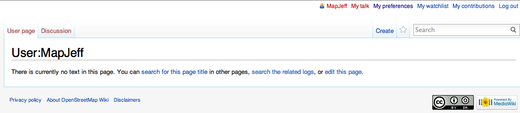
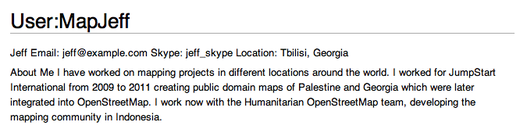
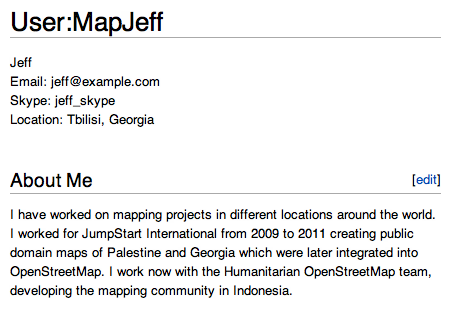
Getting StartedLet’s start out by editing our user page. Every user has a page on the wiki. These pages are commonly used to provide information about yourself, your location, for interpersonal communication, and for creating test pages and drafts. This is a great place for us to start, and learn the basics of editing a wiki page.
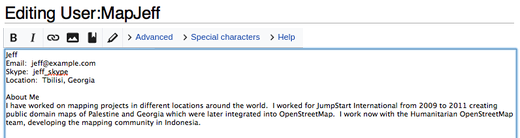
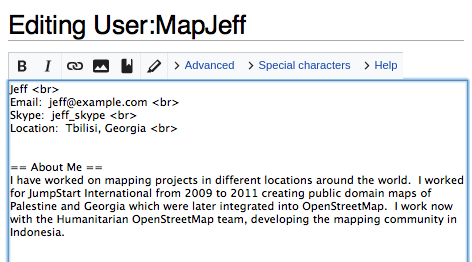
https://wiki.openstreetmap.org/wiki/User:MapJeff More FormattingThis section deals with formatting using the source editor. If you want to use the visual editor then consult the official guide. You should experiment with both editors in order to decide which one to use. If you just want to make minor adjustments or fix typos then it might prove quicker to use the source editor. In this section we will discuss many of the different ways you can format your information on a wiki page and the appropriate codes to use to create different elements. It’s a good idea to practice before trying to create an official wiki page that you want others to see, so first let’s create a sub-page under your user page where you can play around and practice editing.
https://wiki.openstreetmap.org/wiki/User:MapJeff/testpage
Now let’s look at how to format our text. Feel free to use your test page to try things out. Basic Formatting
Special Formatting
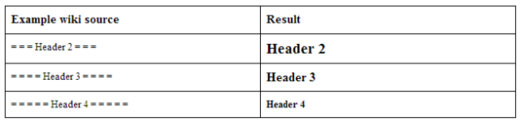
Headings and SubheadingsA section starts with a header consisting of a line beginning and ending with two or more consecutive equal signs (=). The number of equal signs indicates the nesting level of sections. When you create sections and subsection headings in your wiki page, the page will automatically have a table of contents section created at the top of the page.
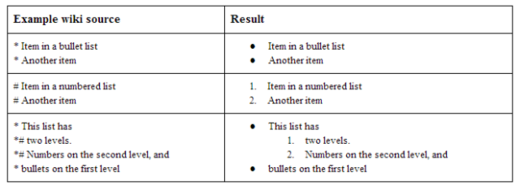
ListsIt’s easy to create a bullet list. In order to make an item in a list, you simply need to use a star (*) as the first character on one or more consecutive lines. To create an ordered list, you simply use number signs (#) instead of stars (*). You can create nested lists by using a combination of stars and number signs. Nested lists display as lists with different levels of indentation. When nesting lists you may mix bullet lists and numbered lists on each level.
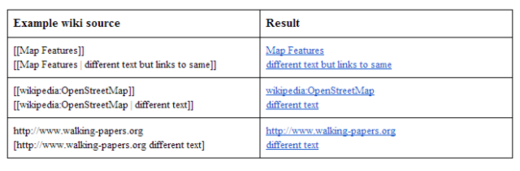
Links
If you want to link to an article on Wikipedia, prefix the name of the article with “wikipedia:” For example, [[wikipedia:article-name]]. If you want to link to a wikipedia article in another langauge, you can add the language code like this: [[wikipedia:de:article-name]]. Finally, if you want to create an external link, simply type the URL and it will display as a link. If you want to change the link text, you can use one set of brackets to change the text which links to your URL [external-link link-text].
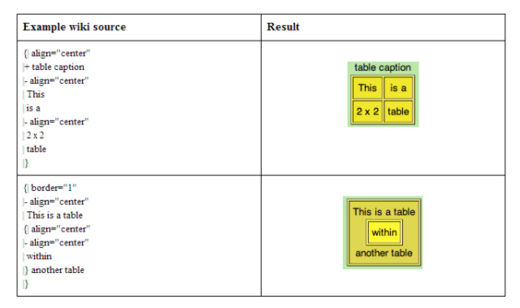
TablesTables are probably the trickiest thing to create in a wiki, but easy once you understand how it works. First, you need to understand that a table is really a grid that has some number of rows and some number of columns, and one type of information is contained horizontally in rows and another type vertically in columns. A basic table needs the following parts:
It is good practise and increases readability to use a space as second/third character, thus avoiding any ambiguity.
Play around with all these different techniques for formatting your wiki. If you want an example of all of these things, try viewing the test page I created here: https://wiki.openstreetmap.org/wiki/User:MapJeff/testpage Compare the wiki text to the way it is formatted when you are viewing it. You can find more information on editing at https://wiki.openstreetmap.org/wiki/Help:Wiki-Editing. 4. Conventions and GuidelinesYou can create any wiki page the same way that you have created your user page. However, before you run off creating pages to your heart’s content, it is important to understand some guidelines for how to best contribute. Some key things to keep in mind are: Before Creating a Page
https://wiki.openstreetmap.org/wiki/Map_Features When Structuring a Page
Translating PagesOne very useful thing that can be done on the wiki is to translate important pages into your language. As you’ve already seen, many wiki pages have links at the top where you can switch languages. However, this is only available for pages that have been translated, and that include a special tag at the top - `` When developing the OpenStreetMap community in your country, it is very useful for key wiki pages to be translated into your language. Adding translated pages is easy, as we will see here. The names of pages are always created in English, but different versions of the same page can be created by adding a language code into the URL. For example, the Map Features page is at https://wiki.openstreetmap.org/wiki/Map_Features If you want the Spanish version of this page, it is available at https://wiki.openstreetmap.org/wiki/ES:Map_Features If a page exists that you want to translate, you simply visit the URL with your language code and a colon (:) preceding the page name. For example, if we wanted to translate this page into Indonesian, we would visit https://wiki.openstreetmap.org/wiki/ID:Map_Features Then we click “Edit” to create this page. The easiest way to add a translation is to go to a page in English, click “Edit”, and copy all of the wiki text to your Clipboard. Then edit the page in your own language, pasting in the original English text and translating it into your language. This will allow you to keep all of the original formatting and links correctly, but translate the English text into your own language. Watching PagesYou may want keep an eye on pages that you have edited yourself, or that you have an interest in. To do this, you can add specific pages to your “Watchlist,” which keeps a record of recent changes to pages, so that you will know when others have edited them. To add a page to your watchlist, click on the star at the top of the page section:
Then, you can view your watchlist by clicking on “Watchlist” at the top of the page:
On the “Watchlist” page you choose to show changes to your watched pages within the past hours, or days, or since you started watching the page. SummaryIn this chapter we have learned how we can edit and add pages to the OpenStreetMap wiki. You should now have a decent understanding of how to create a new wiki page, how to add different formatting, and how to create translations of existing pages. Furthermore, It would be very helpful to discuss a bit the concept of templates as the OSM Wiki uses them a lot and those templates can be quite confusing for beginners
Was this chapter helpful?
Let us know and help us improve the guides!
|