Remote editing & its place in the HOT team
Reviewed 2015-09-18
Remote mapping is also referred to as ‘Armchair mapping’, and this is probably the type of mapping you will be doing if attending a mapathon. It will help you to understand what is needed if you know more about the whole process. Many people throughout the world are involved in making HOT work, and when you start remote mapping you become part of that team, which has many available roles, including (this is not the full list!):
- Sourcing & preparing satellite imagery,
- Making sure there are no legal implications such as copyright,
- Co-ordinating with the aid agencies,
- Ensuring the data is available in a format the aid agencies can use, such as Garmin maps, Osmand maps, & exports for particular programmes,
- Preparing teaching aids,
- Presenting the tasks in a format that others can use to create the maps,
- Making contact with the local people, and teaching them about HOT,
- Teaching local people how to do ground surveys and update the data for their own & others use,
- Making sure that local people take over the role of maintaining the map data that has been prepared - that they have ‘ownership’ of it,
- & remote mapping.
Remote mapping is the most labour intensive task. There have been many attempts to create software tools to replace the remote mappers, but all have failed so far. In brief, remote mapping is the process of using a software programme, tracing information from satellite imagery, and uploading the result so that it forms part of the map data. It is a skill that can be acquired with patience. There are no perfect ‘mappers’ and although you (and everybody else) will do your best to avoid mistakes, mistakes are inevitable. The HOT team works together to keep mistakes to a minimum & to correct them when they are found - you will make mistakes, just as each one of us has - please don’t give up, just learn from them & improve.
Overview of Remote, Armchair or Mapathon mapping
-
An administrator selects an area requiring updating in OpenStreetMap. The administrator ensures there is suitable satellite imagery available for remote mappers to trace, and creates a project covering the area. The level of detail required and the urgency are specified within the project together with any other information the remote mapper will require. When satisfied, the administrator publishes the project within the Tasking Manager tasks.hotosm.org, although they may also make changes later if required.
-
A remote mapper selects a task square, completes the mapping, and marks the square as complete.
-
A second remote mapper checks that the square is completed to a satisfactory level and marks the square as ‘validated’
-
Progress of the mapping of the project can be monitored from within the “stats” tab of the project, and the project can be downgraded or archived as required by an administrator.
Before you start
Take a few minutes to look at each of these - just a quick read so you know roughly what we are talking about, and where to refer back to when you need to:
- OpenStreetMap.org section of LearnOSM. This covers just the basics about OpenStreetMap, and reading this will help you a lot - it’s not a big chapter so it won’t take you long to read it all. While you are reading it, use the information to help you create an OpenStreetMap account, and to confirm it with the email link. Make sure you have a record of your username and password.
- Tasking Manager Section of LearnOSM. You will need to know how to log into the Tasking Manager, find a particular project, select a square, and what to do with it. You need to read the whole chapter!
You may also like to view the short video’s provided by MapGive - please be aware the OSM Tasking Manager has been upgraded since the video was made - the principles are the same but the colours have altered.
Editing Software
Although there are more software programmes available, at this time there are two main choices. Have a quick read of the LearnOSM chapters listed below and decide which editor you would like to start with - you can easily change from one to another at a later stage if you wish:
Remote Mapping - Starting to map
Don’t give up on us now - we’ve thrown a lot of information at you, but it should start to fall into place as you actually start to map. You’ve achieved a lot:
- You have an OpenStreetMap account with a username & password,
- You know what the OSM Tasking Manager does, and have an idea about how you will use it, and
- You’ve decided which editing software you are going to start with, and you have an idea how it is used.
We’re now going to select a square from a project and start to map it. If you are at a mapathon, or assisting remotely, the organisers will have provided instructions as to which project you should be working on. If you are working alone, look through the list of projects in the Tasking Manager tasks.hotosm.org and try to find a project which is suitable for beginners, and choose a project. You’ve probably already had a quick read of the information on the Instructions Tab of the project, but you need to thoroughly understand what is needed - do you need to read it again?
Having selected the project you are going to work on, now select a square and then using the drop down list, load it into your chosen editor.
Initial View
iD
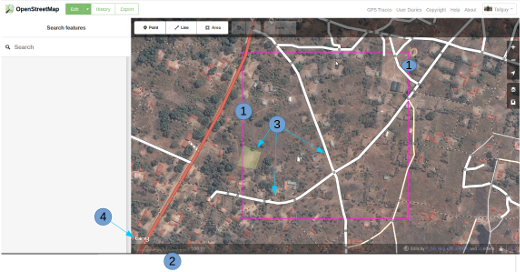
- The boundary of your square is indicated by the purple line. There is a very slight overlap of the squares, so that a feature in your square that stops at the boundary will just appear within the boundary of the adjacent square. You should only map features within your square to avoid ‘conflicts’, which are explained elsewhere.
- The scale of your view is indicated here. This is a very small square, with the 100 metre line extending quite a long way in proportion to the length of the square - this figure is often several kilometres.
- Several features already exist within the OpenStreetMap database, and these have been loaded. We will explore them in a moment.
- bing imagery has already been loaded as a background.
JOSM
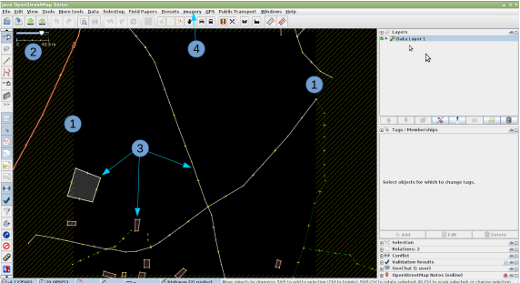
- The boundary of your square is indicated by the crosshatching. There is a very slight overlap of the squares, so that a feature in your square that stops at the boundary will just appear within the boundary of the adjacent square. You should only map features within your square to avoid ‘conflicts’, which are explained elsewhere.
If the boundary crosshatching is not visible, you may have installed the plugin ‘Download OSM data continuously’. To correct this you will need to remove the tick for this plugin under the File menu of JOSM, delete the downloaded data, and download again using the Tasking Manager.
- The scale of your view is indicated here. This is a very small square, with a figure of 40.8 metres - this figure is often several kilometres.
- Several features already exist within the OpenStreetMap database, and these have been loaded. We will explore them in a moment.
- There is no background imagery loaded on this occasion and we will have to load it manually - the instructions for this particular project show that bing imagery is to be loaded, and this can be quickly loaded by clicking on the word ‘imagery’ and then selecting ‘bing’ from the dropdown list. You may find that zooming out (roll the mouse centre wheel towards you) and then zooming in again helps the imagery to load quickly.
Alternate initial view
iD
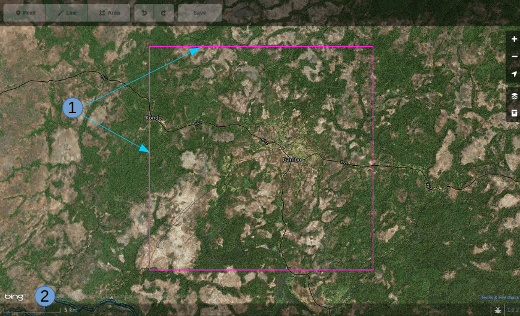
- Boundary of square.
- For this square the scale indicated is 5km, at which scale the editing buttons at the top of the screen are greyed out and not selectable.
JOSM
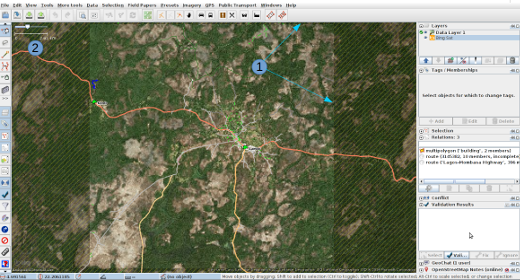
- Boundary of square is indicated by the crosshatching. bing imagery has been loaded, but at this scale the imagery is not detailed.
- The scale line indicates 2.61km - this is a very large area of coverage.
Checking on the existing data
iD
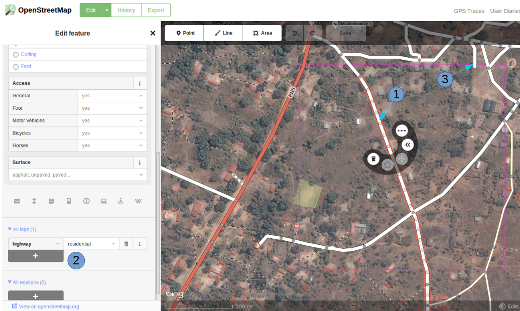
- I’ve clicked on one of the existing features in the OSM data, and it is now highlighted with a red border in the screenshot, and iD is showing the available tools.
- iD presented me with a number of potential tags I could use on this feature on the left side of the screen, but for our purpose I have used the scroll bar to go down to the heading All tags where we can see that the feature has a key of highway and a value of residential. For ease of reference this would be referred to as
highway=residential
- The person who has mapped the adjoining square has traced a highway from their square just over the border into my square & then stopped. This is the correct way to ‘handover’ a highway or feature at the border of your square.
The next section of this guide indicates how features should be mapped & tagged Tracing roads, buildings, water and landuse.
JOSM

- I’ve clicked on one of the existing features in the OSM data, and it is now coloured red in the screenshot.
- In the Tags / Memberships pane to the right you can see that this feature is tagged with the key of highway & a value of residential. For ease of reference this would be referred to as
highway=residential
The next section of this guide indicates how features should be mapped & tagged.
Further Reading
