|
|
Tasking Manager Administrator GuideIf the user interface of the version you use looks different from the one described here then you should consult our version overview Section Index
The Tasking Manager is the essential tool to coordinate mapping on OpenStreetMap. It supports humanitarian mapping initiatives, conducting mapathons or creating mapping tasks for students. The application divides an area of interest into manageable geographic chunks that can be completed rapidly and collaboratively. This approach allows the distribution of tasks to many individual mappers, while reducing possible editing conflicts. The software encourages accurate and quality mapping data by providing a consistent set of instructions for your mappers (e.g. ‘map all roads and buildings’). In short, the Tasking Manager is how you set up and direct the workflow for open mapping activities. This guide describes the basic administration of the Tasking Manager. It covers instructions to create and modify mapping projects and handling permissions for mapping and review of crowd-sourced data. Login and accessIn order to login to the Tasking Manager an OpenStreetMap (OSM) account is needed. You can visit the HOT Tasking Manager, or any other community instance of your preference. There click PermissionsThe most basic user level is mapper. Mappers are able to login to the Tasking Manager to find and select a mapping project to work on. All mapper functionality is described in the LearnOSM Tasking Manager Mapper Guide. Note that some projects, such as those in draft state (i.e. unpublished), or restricted to certain teams, are not visible to regular mappers. All special permissions are handled by organizations and teams. An organization is the main umbrella, and under each organization mapping projects and teams can be created. An organization could represent a data user such as a humanitarian organization, or any OpenStreetMap community. If you need to set up your organization on the Tasking Manager, contact the technical maintainers of the Tasking Manager instance. See HOT Tasking Manager Organizations for a list of organizations which are present on HOT’s Tasking Manager. If your community or organization is not listed there and you’d like to create projects on HOT’s Tasking Manager, please complete this form to register your interest. Every organization has one or more managers. They have the permission to create and modify associated projects. All manager options can be accessed through the Managers of an organization can create teams. Teams are groups of OpenStreetMap users and they can be publicly visible or private. They also have one or more team managers. Teams can be set up so that users can join a team on their own or ‘invite only’, which means that the team managers are notified about requests to join and must decide upon them. For each project, administrators can assign specific teams to grant or restrict access to either mapping, define who can validate the data, or who else is able to edit the project’s metadata. Create a projectClick on
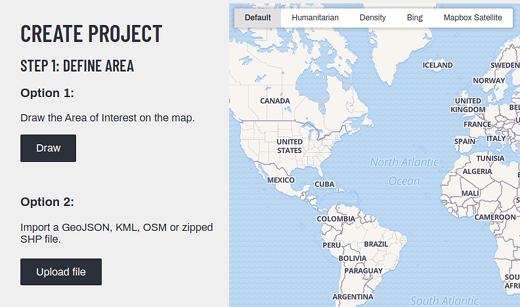
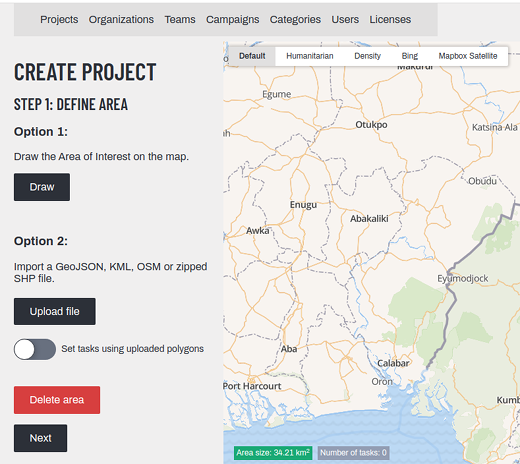
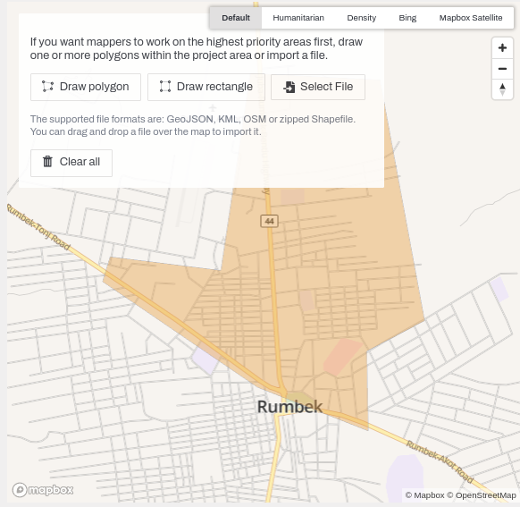
You may choose between defining the area of interest (mapping area) of your mapping project by either:
Define mapping area
You might be uploading a file that already has the tasks (small mapping squares) pre-defined. Find more information about this in the Define tasks with imported data section below.
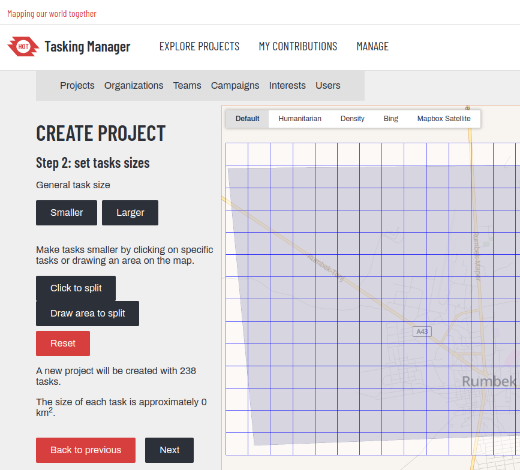
Define tasksAfter the overall mapping area has been defined, it is going be divided into smaller areas called Tasks. You must consider your project’s task sizes very carefully. Well designed projects have appropriate task sizes, allowing them to be completed as efficiently as possible.
The project area is automatically split into grid cells and each cell becomes a task. Use the Please take your time and set your task sizes very carefully! Try and aim to reduce your task size down to where you think it would take a confident mapper 15 minutes to complete. The optimal task size entirely depends on the feature(s) you are asking mappers to identify and the density of those features. For example, a road mapping project in a rural area would have much larger tasks than a project that involves digitizing buildings in a dense settlement.
After you’ve adjusted the overall task size, you can selectively split certain tasks into four smaller ones with the Considerations for deciding on task sizes:
Once you are happy with your task sizes, click Advanced: Define tasks with imported dataIf you uploaded a file to define your project area, that file may also contain the shapes for the individual tasks. For example, a completed project from MapSwipe which focuses on populated areas or a complex grid you have pre-created in QGIS. If that is the case, make sure to enable the ‘Set tasks using uploaded polygons’ toggle. This will skip straight to the naming stage of project creation.
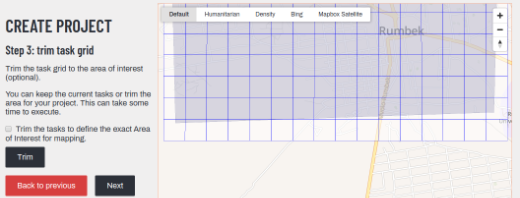
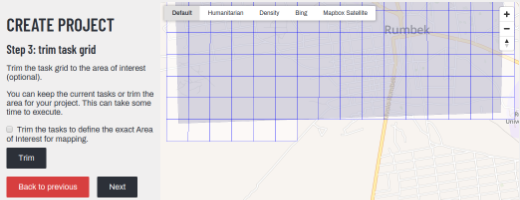
Project area trim
After determining the task sizes you will have the option to trim the tasks to the extent of your mapping area. You will almost certainly want to do this. Click on
If you toggle on ‘Trim the tasks to define the exact Area of Interest for mapping.’ before clicking on
Trimming sharply may result in some extremely small tasks. These tiny tasks can confuse mappers. You can choose to remove them by selecting
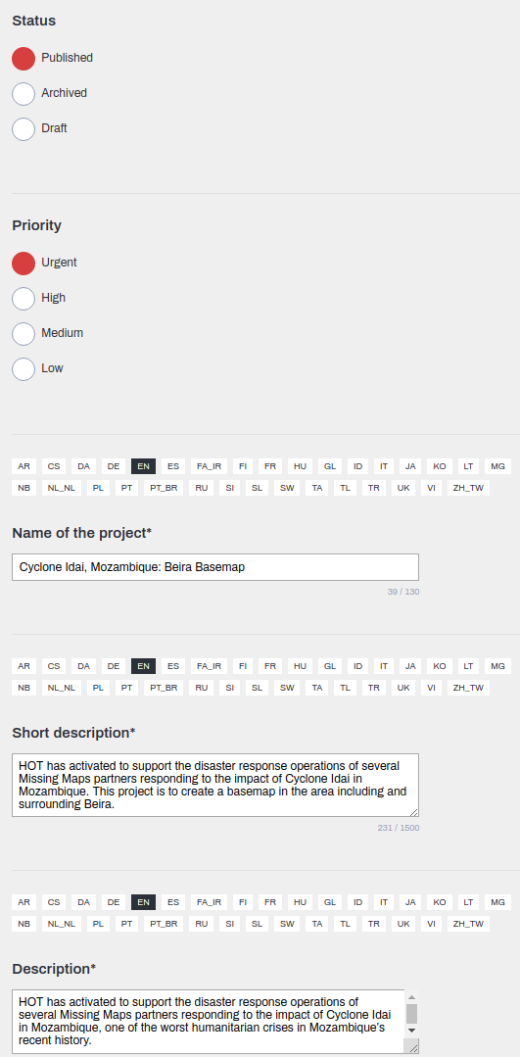
Click Name the projectA project’s name is one of its most important aspects when it comes to being discovered by the wider public. Try and include the name of the country the project is located (e.g. South Sudan), the reason for mapping (e.g. COVID Vaccination) and also the more specific location, maybe the district or settlement name (e.g. Yambio County). For example a full project name might be: South Sudan, COVID Vaccination, Yambio County. Ensure your organization is selected under the ‘Organization’ field.
Click Edit a projectYou’ll now see the ‘Edit’ menu of your project. Before the project can be saved, you’ll need to go through the ‘Edit’ menu carefully to complete setup. Here is a quick summary of the sub-menus you will see on the left hand side:
Description
StatusFirst is the project status. This can be set to either Draft, Published, or Archived.
PriorityNext is the project priority. This dictates how close to the front of the Tasking Manager the project will be seen in the Explore Projects page. This can be set to either Urgent, High, Medium or Low.
Short descriptionAdd at least two sentences that briefly describe your project. This is important because volunteers will read this to decide on whether to contribute. Try and clearly explain why the data is being collected and how the map data will be used.
‘Long’ DescriptionYou can go into more detail about your project here. Provide more information about why the project exists, who will use the data and the expected the impact the mapping will have. If the project involves any collaborations or partners you could expand on that here.
Due dateIf you have a date by which you wish your project to be completely mapped and validated you can add that here. This is optional and once the date is exceeded it does not change anything for the project and volunteers can continue contributing afterwards. Contributors will see the due date listed next to the project. Instructions
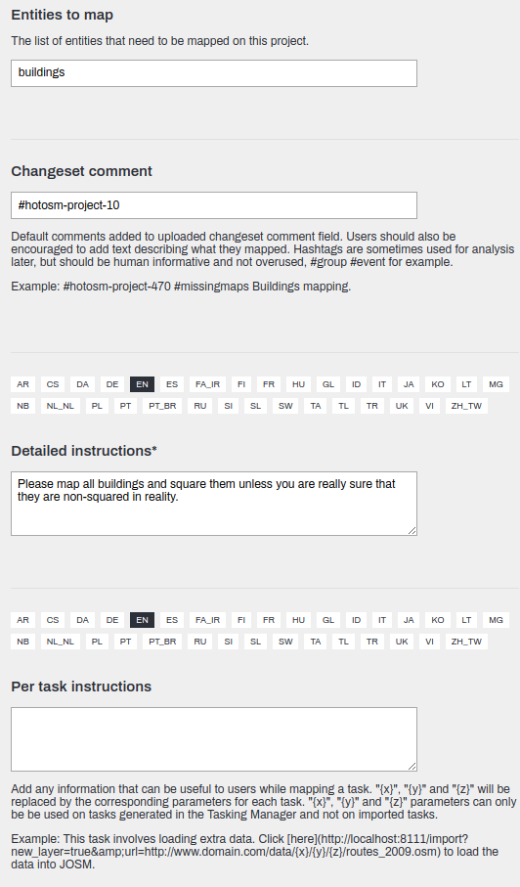
Changeset commentHere you can add additional tracking tags which will automatically populate each time someone saves their work while mapping your project. For example, if you want to start tracking all contributions across all your organization’s projects you might want to add a common tracking tag to them, e.g. #MSF or #cartONG. Please try to keep these tags short and do not add too many of them, cluttered changeset comments are confusing to interpret and space should be left for mappers to leave descriptive changeset comments.
Detailed InstructionsAdd descriptive instructions for mappers and validators to follow while working on your project. Your project will be public, therefore write instructions for inexperienced users with no local or contextual knowledge. Please use plain language as your target audience may not be native English speakers.
Per Task InstructionsThis is optional but it is possible to add a short snippet of additional instruction that mappers will see while they are working on a task. This is seen on the right hand side of the Tasking Manager editor view above the ‘Task Status’ section. This will be seen at all times while mapping, so if there is something particularly important that you want to instruct mappers about you could add that here. Metadata
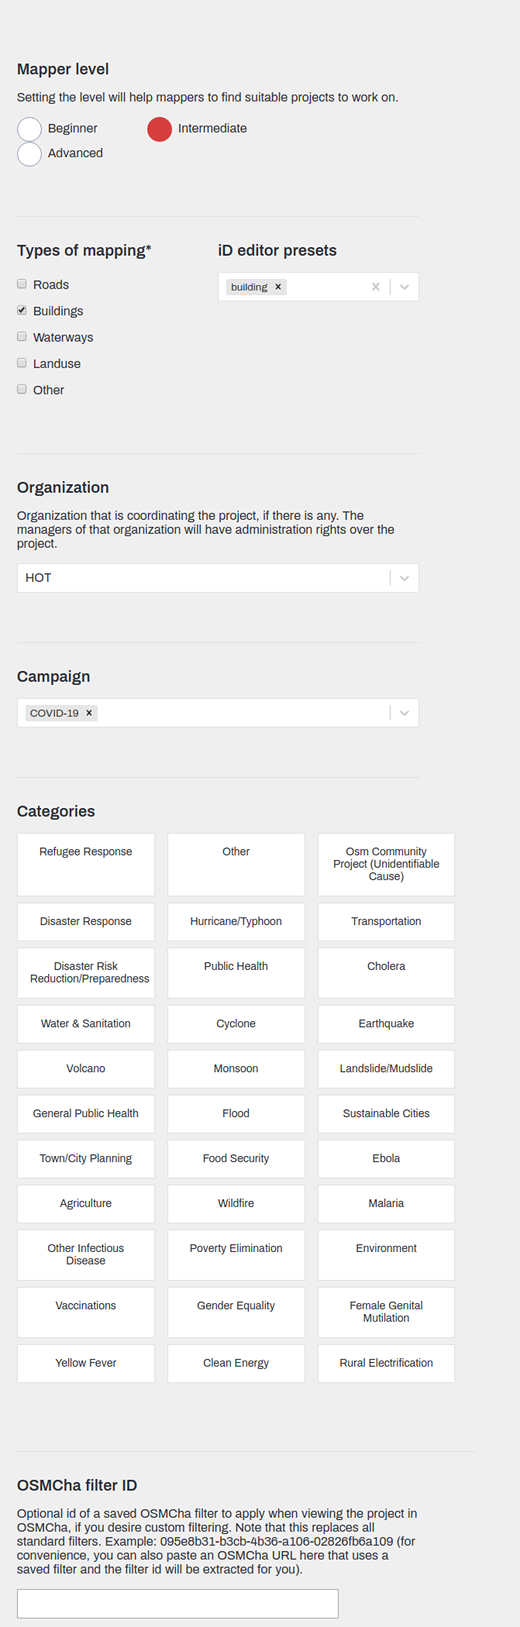
Mapper levelThis changes the difficultly level which is displayed for your project. Consider this very carefully, complex projects which are inappropriately set to Easy difficulty can result in significant data quality issues.
Most projects are set to either Easy or Moderate difficulty, a handful of projects are set to Challenging.
Types of mappingToggle these on/off depending on the features that you wish to be mapped in your project. Generally the fewer features the better, as projects which aim to map too many features often struggle to make much progress.
iD Editor PresetsIf you choose one or more items from the drop-down list then mappers using iD will only be able to assign these features to the objects they map. This is recommended for easy, buildings-only projects. It will mean that contributors will not be able to tag other features, even if they try. Avoid using presets for more complex projects, as it can quickly become a burden. For example, a highway mapping project would need dozens of presets to be added to ensure all highway types could be mapped. OrganizationYour organization name should be in here already, otherwise choose it from the dropdown menu. CampaignIf you have created several projects which are associated with each other, you can choose to assign them to a campaign. Users can filter projects by campaign name on the Explore Projects page. For example, if your project is associated with malaria elimination, you might want to put it under the ‘Malaria Elimination’ campaign. To request the creation of additional campaign names please complete this form. CategoriesSelect the themes here that relate to your project. Contributors can specify their interests in these categories in their settings page. OSMCha filter IDOSMCha is a powerful data quality assurance tool that you may find useful for monitoring contributions to your project. The standard filter confines output to the bounding box of the project and to contributions not older than the project creation date and with the name of the project in the changeset comment. If you think something different would be a better approach to analyze the changesets of your project then either provide an OSMCha URL or an OSMCha filter id here. The OSMCha filter is available at the end of the overview page of your project. Priority Areas
Use the tools here to draw areas that should be mapped first. You can have multiple priority areas for a project. You can also change priority areas at any time. The priority area will be highlighted for volunteers to prioritize and if they select ‘Map a task’ it will randomly select a task from the priority area first.
ImageryFrom the dropdown menu choose the aerial imagery source that you want to load automatically for your project. If the imagery is not listed in the dropdown you can choose ‘Custom’ and then add a TMS URL.
License - Optionally, if there is a specific license required for the mappers to accept when using the imagery, you can select it here. If you need a license that is not available, you can contact an administrator for the Tasking Manager installation and ask them to add it. PermissionsUnder the ‘Metadata’ menu we could change the difficulty level that was displayed for a project. Under the ‘Permissions’ menu we can change who can actually access a project. It’s important to remind ourselves of the various user levels:
Mapping permissionsHere you can choose who can map your project:
Validation permissionsHere you can choose who can validate your project. Validation is where more experienced mappers check the contributions that are made within your project, therefore this should be restricted to ‘Only users with intermediate or advanced level’ as a minimum. Ideally you should restrict validation even further to ‘Only team members’, but when you do this you must remember to define those teams below. TeamsUse the filters to search for and add teams. You can add your own team(s), but please also feel free to add other teams. Once you have added a team ensure to select a role (Mapper, Validator, Project Manager). Team permissions will not function unless you have restricted Mapping and/or Validation permissions to ‘Only team members’. If you grant a team Project Manager access this will allow its team members to edit the project.
PrivacyToggling to make a project ‘Private’ will hide the project from all users except those that are part of the teams defined above. Settings
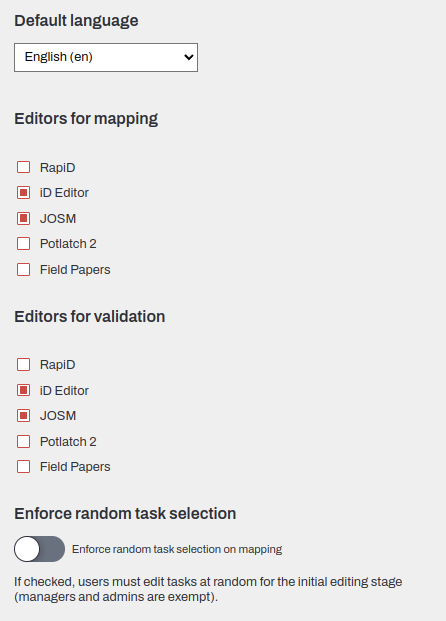
Default LanguageAltering this will change the default language for your project’s title, description and instructions. Editors for mapping/validationThis restricts the available editors to those checked. You may specify different sets for mapping and for validation. Note that it is possible to enable the AI assisted RapiD editor here. Enforce random task selectionIf enabled then contributors cannot select specific tasks for mapping. ActionsHere you can perform powerful bulk actions on your project. Be careful with many of these options, they are not reversible.
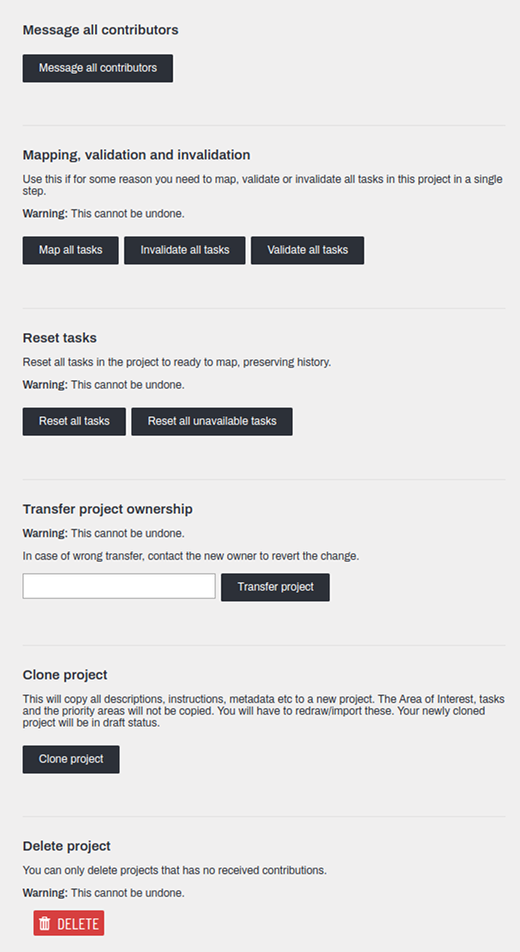
Message all contributorsSends a Tasking Manager message to everyone who has marked a task complete or valid. It can be used to thank contributors and/or guide them to other projects in a campaign. It should also be used before using either of the two Validate/Invalidate all Tasks options described below. Mapping, validation and invalidationThis will set the status of all tasks to either mapped, validated or invalidated. Handle with care as there is no undo. Reset tasksThis will reset all tasks to their pristine state but previous actions can still be seen in the task history. Handle with care as there is no undo. Transfer project ownershipYou can specify another manager within your organization who will become listed as the creator of the project. Search for their OSM username. Clone ProjectThis useful option will create a duplicate of the project, keeping the entire setup identical except for the area of interest, task grid and priority areas which you will need to re-import or re-draw. This option will save you a lot of time if you are creating a series of similar projects that are covering a large area. Delete ProjectThis will permanently delete the project from the Tasking Manager. Handle with care as there is no undo. It is not possible to delete a project after any contributions have been made to it. Custom editorIf you would like to link to an editor which is not listed in the ‘Settings’ menu a URL to that editor can be added here. Save and testOnce you are happy with your project setup press Try mapping a task, is the imagery loading correctly? Are the instructions clear enough? If you need to make changes or refinements to your project, click the PublishAfter checking and testing your project, if you are happy with it and ready for mapping to start click the
Project managementCongratulations! You’ve created a project, now you’ll need to make sure you manage it effectively. Be responsiveAs the project creator, you are responsible for responding to questions that arise in the Questions and Comments section of your project page. This section will often include useful guidance or tips from the wider community, take these seriously, respond and make edits to your projects where necessary.
On the project page your username will also be listed next to ‘created by …’. This means that you may also receive direct OSM messages, make sure to read and respond to these.
Sequencing projectsIf you have created a number of projects in a series do not publish them all at once. You are not the only one creating projects, having a reasonable number of projects (one or two) at the appropriate priority is fine. Publishing half-a-dozen at once will crowd out the Tasking Manager. Keep the rest in draft or at lower priority while at any moment only one or two are being worked on. You may notice that contributors lose enthusiasm if they see lots of similar projects all at once that are making little progress. Project lifecycleKeep track of the mapping and validation progress of your projects. Remember that all projects must end up being archived. You will need to do this manually, so do not lose sight of the progress, priority or relevance of your projects. If you are moving to another organization make sure to hand over your ongoing projects to your replacement. Additional informationConsiderations concerning imageryBefore creating your project, check the imagery in several different locations across your project area to make an imagery assessment. In most cases either Esri or Bing imagery should suit your needs. However, there are situations where you might want to choose an alternative source. You may need to consider the following when choosing your imagery:
Imagery alignmentYour project area may have already been partially mapped using older imagery and there might be a noticeable mis-alignment between the older mapped objects and the newer available imagery. Inspect various locations across your mapping area to determine this. If there is an alignment issue, make sure to include detailed instructions outlining the best approach for mappers to take. Projects with imagery alignment issues are best restricted to more experienced mappers. There is not a standard set of instructions when it comes to imagery alignment issues. It is very dependent on context. Sometimes mappers are instructed to align to GPS traces, sometimes they are told to align to mapped linear features such as highways and waterways. Here is a sample approach:
Often mappers are instructed to look for least effort when it comes to imagery alignment issues. Which means that contributors are told to vary their approach depending on the situation in their individual task:
If your project has alignment issues, ensure your task squares are not too large because imagery offsets can vary considerably across a mapping area, particularly if the terrain is not flat. Even imagery discontinuities may occur across a project - look out for them and advise the contributors of such a problem.
Please feel free to check these additional resources on imagery alignment:
Was this chapter helpful?
Let us know and help us improve the guides!
|


