The JOSM Editing Process
Reviewed 2015-07-12
In the previous section you installed JOSM and began drawing your first points, lines, and shapes. You added presets to these objects in order to attach information about them. By the end, you were able to draw your own map in JOSM.
This was good practice, and now we are ready to edit OpenStreetMap.
In this section we will take a closer look at the interface of JOSM, and see how we can use it to edit the map on OpenStreetMap.
The Cycle of Editing
Editing OpenStreetMap with JOSM is similar to editing with the iD editor we saw previously. But because JOSM is a desktop application, it works a little bit differently. The process of editing and adding to OpenStreetMap with JOSM will always be as follows:
- Download the current map data from OSM
- Edit it using Satellite Imagery, GPS, Field Papers, and notes as a guide
- Save changes to OpenStreetMap
Downloading OSM Data
The first editing step is to download the data for the area of the world that we want to improve. Remember that you need to do this every time that you want to make changes to the map, because the map is often being updated by other users.
- Click on “File” in the top left corner of JOSM and click “Download data…”. This will open up the download window. You can access this window more simply by clicking on the download button, shown here:

- When the download window opens, you should see a map. If you don’t see the map, click on the tab marked “Slippy map”.

- Use your mouse to pan and zoom it to an area that you know very well, such as your hometown or neighborhood. The controls are the same as in the JOSM map window. The right mouse button lets you drag the map, and your scroll wheel allows you to zoom in and out.
Sometimes if you are working on a notebook computer it can be difficult to scroll in and out. Working in JOSM is much easier if you have a mouse, but most modern notebooks allow you to scroll using the touchpad.
- Draw a box around the area that you want to download. To draw a new box, click on the map, hold your left mouse button down, and drag your mouse to create a box. Release the mouse button to finish drawing the box.
- When you are satisfied with the size and location of the box, click “Download” at the bottom of the window. JOSM will get the data for this area from OpenStreetMap and open it in your map window for editing.
Add Imagery
If you followed along when we added our first points with the iD editor, you remember that beneath the map data there was a satellite image that helped us identify objects on the ground. This imagery was from Microsoft Bing, which generously provides its imagery for OpenStreetMap users to reference while contributing to the map.
- To add the Bing satellite imagery in JOSM, click “Imagery” on the top menu of JOSM and selecting “Bing Sat.”
If you don’t see Bing Sat on the Imagery menu, you may need to activate it in the JOSM preferences. Go to Edit -> Preferences and click on the icon that says “WMS TMS”. You may need to click on the down arrow to find it.


Click on “Bing Sat”. Then Click “Activate”.
Tour of JOSM
Now that we’ve downloaded OpenStreetMap data and added the Bing satellite imagery, let’s take another look at the interface of JOSM.
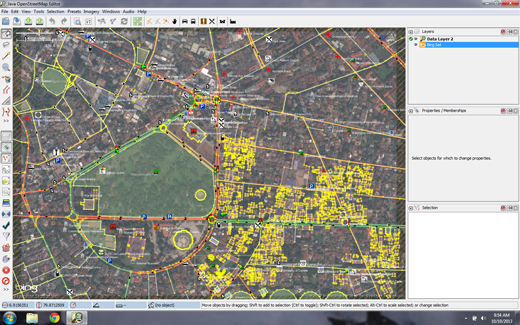
The main window you are already familiar with - this is the map window, and it is where most of the action takes place. Here you will view, edit, and add to the OpenStreetMap data.
To the right of the map window are a series of panels, each of which has its own function. Typically when you first install JOSM several panels are shown by default, such as Layers, Properties, and Selection. When you select a point, line, or shape in the map window, it will be shown in the Selection panel. Information about the object will be shown in the Properties panel, and the username of the author of that object will be shown in the Authors panel.
These panels can be opened or closed by clicking on the various buttons on lower left side of JOSM. Above these buttons in the upper left are tools which change what you can do with your mouse. You are already familiar with some of them, the Select tool and the Draw tool. Below them are tools which make it easier to zoom in, delete an object, draw a shape, or create a line that is parallel to another line.
Edit
So we have completed step one of the editing process - Downloading. We have prepared JOSM with satellite imagery as a reference. The next step is to edit the map and add new items.
Depending on the area that you chose to download, there may be a lot or very little existing map data. But notice that it is the same sort of data that we have seen previously - points, lines, and shapes that represent real-life locations.
- Use the techniques you have already learned to add a couple points to the map of places that you know. If you see any mistakes, try to fix them.
- You don’t need to be too aggressive while you are learning. If you are unsure about something it’s better to leave it as it is.
- If you want to move a point, line, or shape, use the select tool. Click on an object and drag it where it should be. This can be used to correct the location of items that have been put in the wrong place.

- Use the draw tool to draw new points, lines, and shapes. Describe these objects by selecting from the Presets menu, as you did in the previous section.
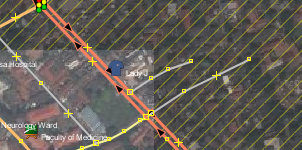
Never edit the map outside of the area you have downloaded. You can see the rectangular area you have downloaded has a solid background, while the area you have not downloaded has diagonal pinstriped lines.
Save Changes
The third and final step to complete our edits is to upload the changes we have made to the OpenStreetMap database. To save the changes, we must be connected to the internet.
-
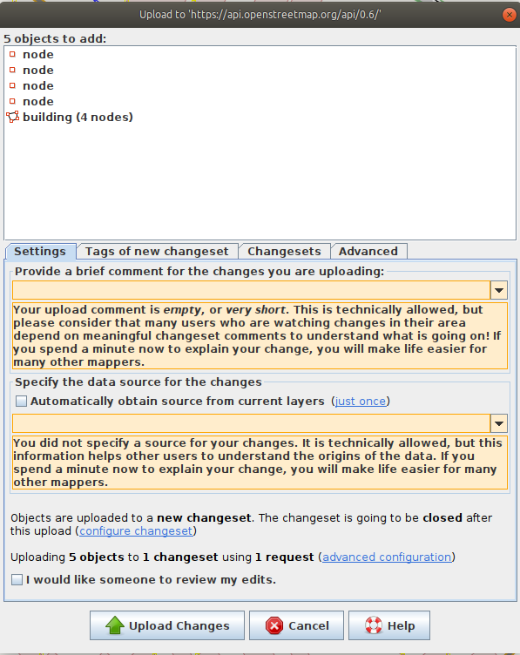
Click “File” on the top menu, and then click “Upload Data”. This will open up the upload window. You can access this window more simply by clicking on the upload button, shown here:

-
The window that appears shows a list of the objects that you are adding and the objects you are modifying or deleting. In the box at the bottom you are asked to provide a comment about the changes that you are making. Type in here a description of your edits.
-
Click “Upload Changes”.
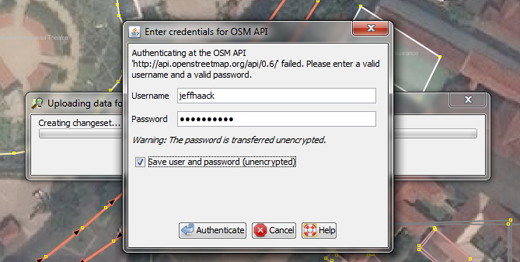
- If this is your first time saving changes to OpenStreetMap, you will be asked for your OpenStreetMap username and password.
-
Enter them in the window that appears. If you check the box in this window, your username and password will be saved and you won’t need to enter them again in the future. Click “Authenticate”.
- You will need to wait a few seconds for your changes to be uploaded, and then you are done! You have edited the map on OpenStreetMap.
When you are editing, always be sure to upload your changes before you close JOSM. Even if you still have more editing to do, upload your changes, and then go through the process again later when you have time to edit. You don’t want to lose your work!
See your changes on the map
- Open your internet browser and go to http://openstreetmap.org/
- Move the map to the area that you edited.
- You should see your changes now appearing on the map! If you don’t, try pressing CTRL+R to refresh the web page. Sometimes the browser still shows the old version and needs to be reloaded.
- What if you don’t see your changes? Don’t worry - it may take a few minutes for the changes to be shown on the map. Also, check your additions in JOSM to make sure that you added them correctly. A good general rule is, if your point has an icon in JOSM, then it should be seen on the main map at the OpenStreetMap website.
Summary
Now that you’ve seen how to add to OpenStreetMap, what’s next? Well, editing is great, but it’s not the only aspect of making maps. Of course you also need to learn how to go outside and collect information about places on the ground.
