|
|
OsmAnd 2.x
OsmAnd (OSM Automated Navigation Directions) is an open source application for map viewing, editing, track recording and touring which utilizes the OpenStreetMap (OSM) database for both online and offline use. It also includes a routing and navigation feature, with visual and voice guidance, that is also available online and offline. OsmAnd enables users to contribute directly to OpenStreetMap by reporting bugs, uploading GPX tracks, and adding (or editing) POIs.
The iOS version is available from iTunes.
In addition to the above sources, a community-maintained version is available from F-Droid, or through third-party software sources like Amazon. Getting StartedOsmAnd lets you use live, online maps, as well as offline databases from OpenStreetMap that do not require an internet connection. The latter, assumes that the necessary steps to download and store the offline database in your device has been completed. The offline capability of OsmAnd is one of its many strengths. Therefore, one of the very first task a new user may want to do is to download the database(s). And, if you are interested in voice-assisted turn-by-turn navigation, you will have to download the voice files, as well.
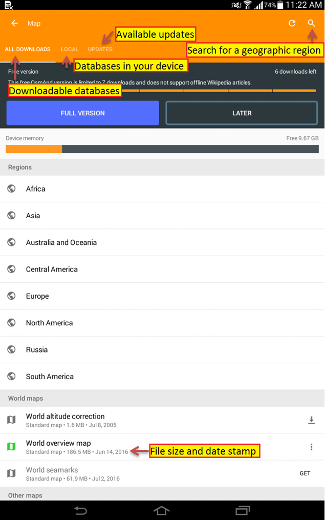
In here, you manage all the online raster files, offline vector databases, and voice files that the OsmAnd app uses.
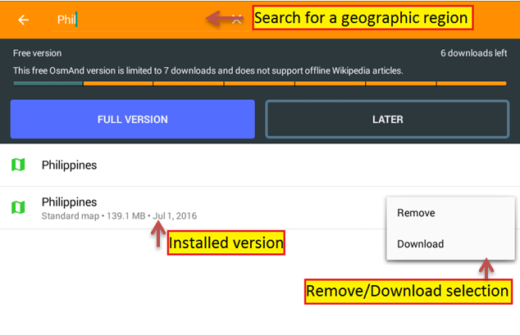
To download a geographic region database, select All Downloads tab and type in a name or geographic region of interest to you.
After selecting the files, press the download button at the options button. Depending on your Internet connection or the number of files selected, this may take several minutes. When you’ve downloaded the files, you’re all set for OsmAnd’s offline mode.
The pre-fabricated databases that were just downloaded are also referred to as “Vector Maps”, and are stored in the .obf format. They are compact, and allow offline users to zoom in at great detail. User Interface
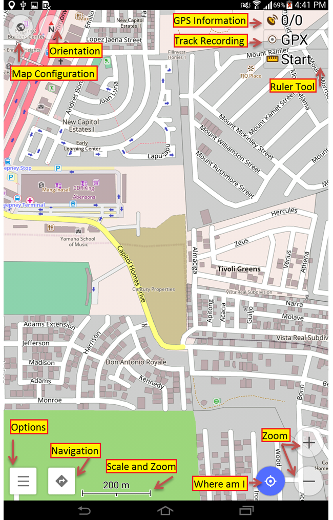
The recent update of OsmAnd for Android to version 2.x (and OsmAnd DVR on iOS to 3.x) improves the interface with the Material Design style, and now includes a Dashboard with different cards, a more user-friendly layout, and simplified editing for OpenStreetMap Points-of-Interests (POI) and Notes. The map canvass will display streets, highways, landuse, POIs, waterways, and many other geographic data. In addition, interacting with the interface buttons:
On the lower right-side panel of the canvass, you may find GPS Information, which displays the number of satellites your device is locked on, and the number of satellites visible in the horizon. Track Recording is visible when the Track Recording plugin is enabled. Same goes for the Ruler Tool, if the Distance Calculator & Planning Tool plugin is enabled. Additional button panels may, or may not be visible depending on whether they’ve been set to show or certain plugins had been enabled. When the GPS or network positioning is enabled in your device, a Position Indicator (your coordinates in anywhere within the blue circle) displays your approximate location on the map. Pressing Where am I button centers the map to the current or last known GPS location. This icon’s outline is blue when positional information is available, and grey when the position is not yet known. Dashboard display various information cards, Search, History, My Tracks and Plugins options. Scale and Zoom indicates the zoom level the canvass in currently in. The display units can be set to Metric or English (in feet or yards), under Options>Settings>General Settings>Unit of Measure. Navigation button opens a dialog for generating From and To navigation routes that are appropriate for the transport mode you select (e.g. vehicle, bicycle, or pedestrian) The Zoom Buttons allows you to zoom in or out of the map canvass. Double-tapping on an area you’re interested in will put that point in the center of the map will put it in front and center of the canvass, and zoomed in to show more details. When you press the Where am I button, the map is centered in the current or last known GPS location.
NavigationDrag a finger across the screen to pan to different areas or direction of the map. A long-press on the screen will show a pop-up that shows a placemark of the specified point.
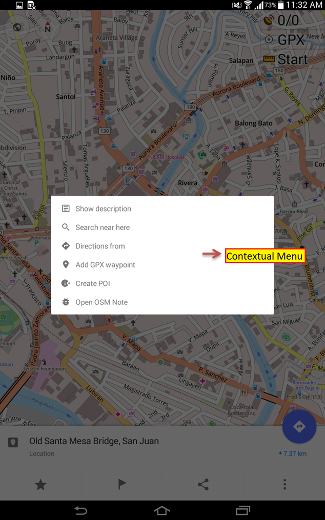
Press on this pop-up to display a Contextual Menu for the specified point.
Contextual MenuThe Contextual Menu displays additional options related to the specified point selection.
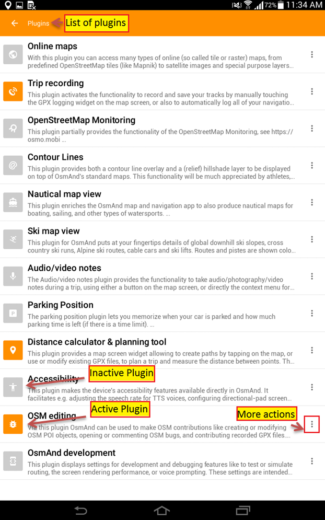
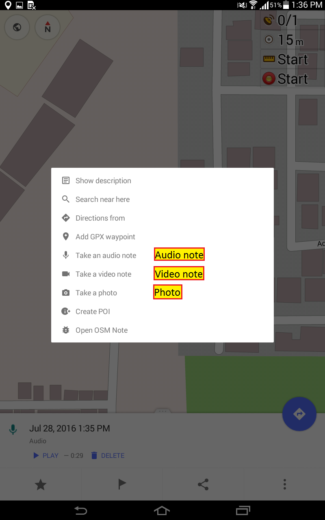
If the Audio/Video Notes plugin is enabled, additional multimedia capture options are also shown: Take an audio note, Take a video note, and Take a photo. To add a new POI directly to OpenStreetMap using the specified coordinates, select Create POI. Use Open OSM Note for notations like bug reports, or to leave comments for other mappers working the same area. The Create POI option is only available when the OSM Editing plugin is enabled. Set this option under Options>Plugins. OpenStreetMap EditingSetupTo enable the ability to add or edit data to OpenStreetMap, OsmAnd must be configured with your OpenStreetMap credentials. Press the Options button and scroll to the Plugins card and on the OSM editing section, press the more actions indicator for additional options.
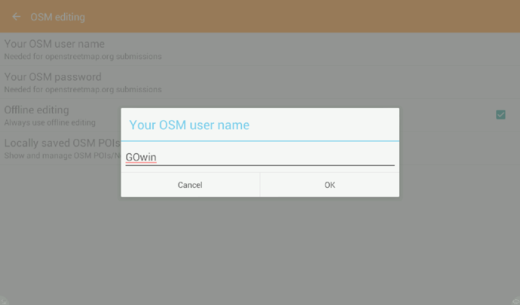
To set your OSM editing credentials, you must have an OpenStreetMap username and password ready.
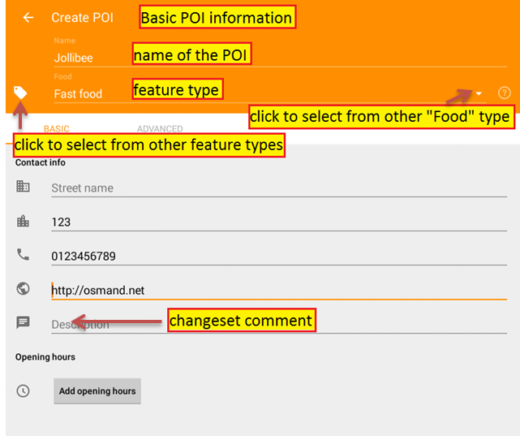
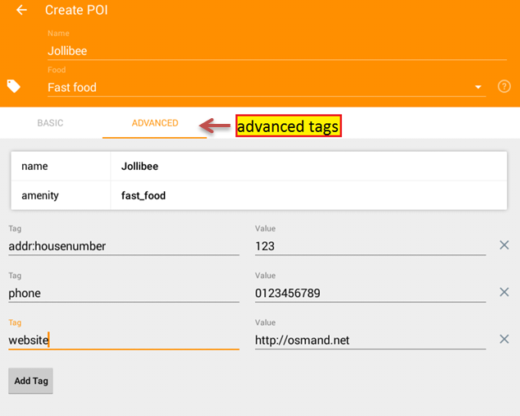
Adding POIsMethod 1: Specify a location by a long-press on the desired location on the canvass then clicking on the pop-up box to display the Contextual menu. Method 2: Use GPS-derived coordinates by pressing the Where am I button then press the Options and selecting Use location. Now, select Create POI from the Contextual Menu to add a new feature, along with the tags. Add the POI’s field information: name, feature type, and a commit comment explaining the feature you’re adding.
In Advanced mode, more tags can be added.
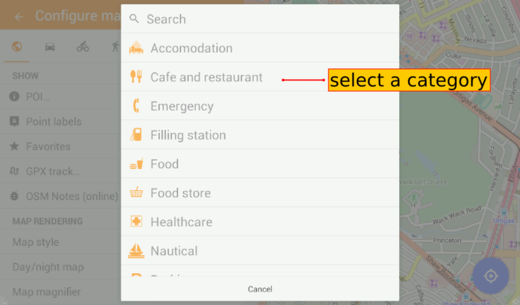
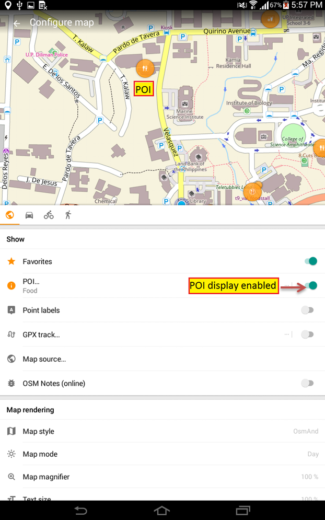
When done, select Save. Editing POIsShow or Display POIsTo be able to edit POIs, make sure to enable them to show on screen by pressing the Map Configuration and enable the POI button and select a category you’re interested in.
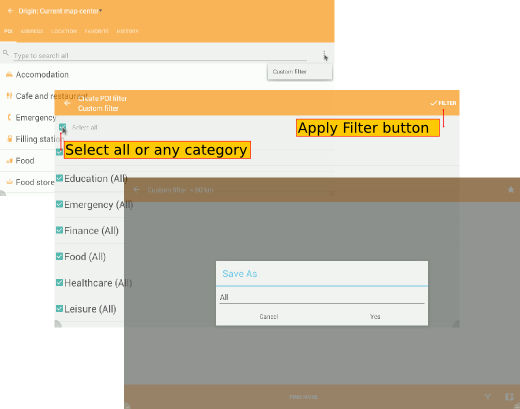
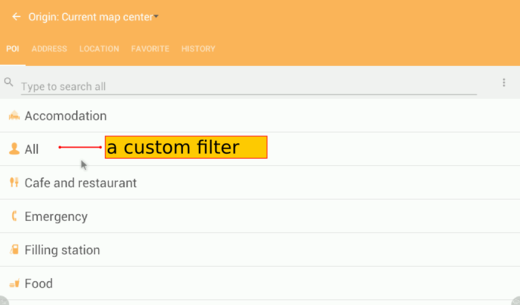
From the POI options, to display any category, press Search then select the more action button select Custom filter. Check the box beside Select all and press the Filter button in the upper right corner of the screen. At this point, and right before hitting the Filter button, you can customize the categories of the POIs you want to display on the canvass. In the next screen, this custom filter can be saved for future use by pressing the star icon. Here, it’s shown being saved as “All”.
Showing the custom filter “All” in the selection list when filtering for POIs.
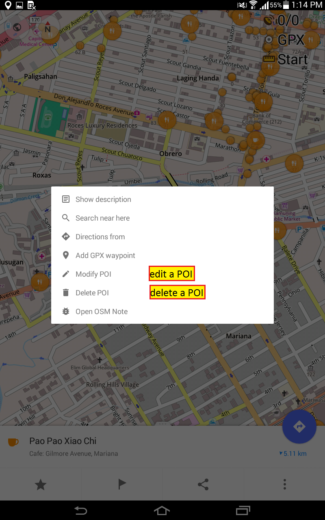
EditingNow that the POIs are displayed on the canvass as orange dots, a long-press over an orange dot POI will display the name of the feature. Press on the pop-up to display the Contextual Menu. Two additional options are available:
A window will appear where you can update the POI fields, as necessary. It’s good practice to add a comment or commit notes when modifying POIs. The POI editor is the same screen used for adding POIs.
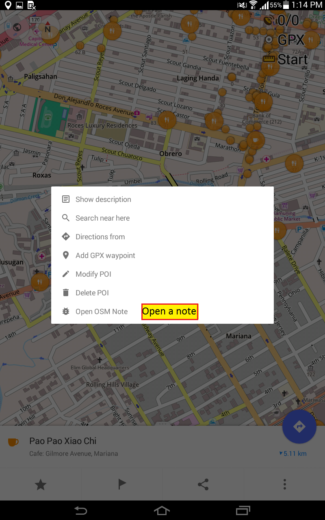
You are limited to editing POIs or point features. Polygons and areas will render as the same orange dots, but will only flash the name of the feature on the screen, but not bring up the Contextual Menu. Adding Notes and Comments, Bug Reporting, Closing BugsAnother way of contributing to OpenStreeMap is by leaving Notes, for the purpose of general feedback, or reporting bugs, or reports that are usable to other active mappers in the area. To display the Notes on the canvass, press Configure Map and ensure that OSM Notes are enabled. You also need to be online via a WiFi connection, or a mobile data plan. Adding Notes and Reporting BugsTo add a Note or report a bug, activatate Use Location from the menu or manually select a location on the canvass (See Adding POIs in the previous section.)
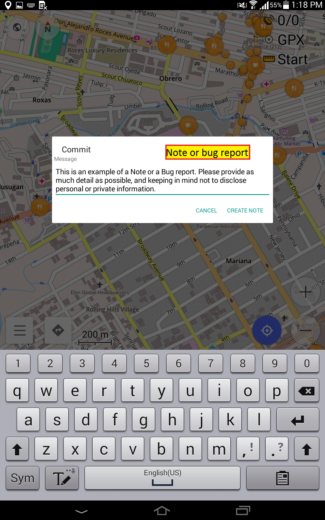
When a location has been set or specified, select Open OSM Note from the menu and a new modal window will appear on your screen. Enter the details of the note, or bug report. If this is the first time to use the plugin, have your OpenStreetMap credentials ready. You may also leave anonymous comments by not inputing your credentials.
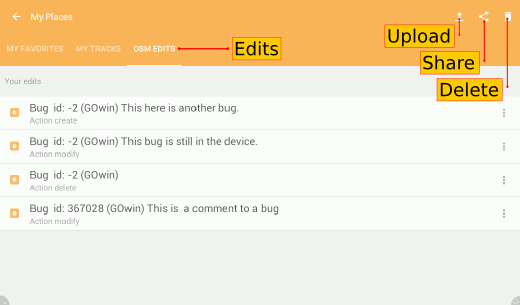
Depending on the device settings, and the Internet connectivity, edits and notes may be sent directly to the OpenStreetMap server, or stored locally in the device until an Internet connection is available. See the next section Online and Offline Editing for additional details. Bugs are rendered as dots on the canvass in several colors:
ConfigurationOnline and Offline EditingIf you are on an uncapped mobile data plan, you may keep the Offline editing setting disabled/unchecked under OSM editing plugin settings. This will send your updates and contributions to OpenStreetMap soon after you’ve saved them. In case Internet connectivity is unavailable, data is temporarily stored to the device, and uploaded soon after an Internet access is restored. If you intend to be mindful of your mobile data usage, enable Offline editing and manually send your edits and notes when you have other means to connect to the Internet. Changes you make offline will remain in your device until you connect to the Internet. You can manage the data in your device from Options > Plugins card > OSMEditing > Settings and select the Locally saved OSM POIs/Bugs option. The data listed in this screen is color coded. Green is for new or modified POIs, and red is for POIs you’ve marked for deletion.
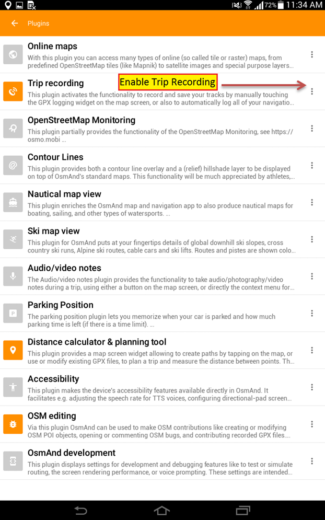
From here, you may opt to upload the data to OSM or export them to your PC. Collecting GPX tracksBefore collecting GPX tracks, verify if Trip recording is enabled under Options > Plugins. If the plugin is not listed, press Show all and find the said plugin from the list.
To capture Audio or Video notes conveniently from the main screen,enable Audio/video notes option from the under Options > Plugins. If you take photos often, instead of video or audio notes, change the default action for the Audio/Video widget. Go to Options > Plugins > Audio/video > Settings > Default widget action and set Take a photo as the default action.
Collecting Photos, Videos or Audio notes.To capture a photo (or video, or audio note) of a particular feature, press and hold over the location on the map, then press the pop-up dialog that comes up and select an action: take an audio note, take a video note, take a photo, or select other appropriate options from the context menu.
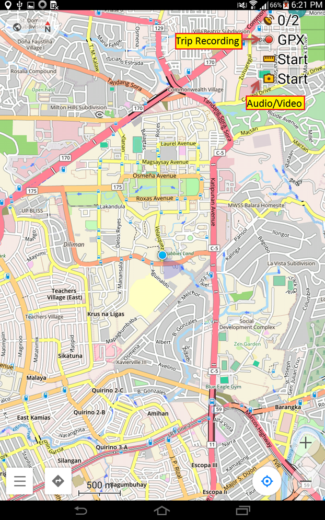
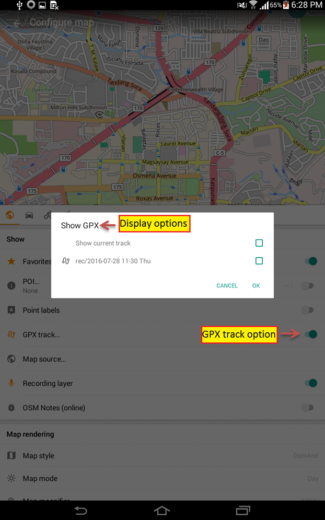
Displaying GPX tracksTo display the GPX tracks, press the Map Configuration button and enable the GPX track… option. This will display a list of options including the current track you may be recording, or other GPX tracks you’ve previously recorded or stored in your device’s OsmAnd folder. Showing GPX tracks on the canvass is useful for keeping track of your progress while on the field , and to check whether there’s anything you’ve missed along the way.
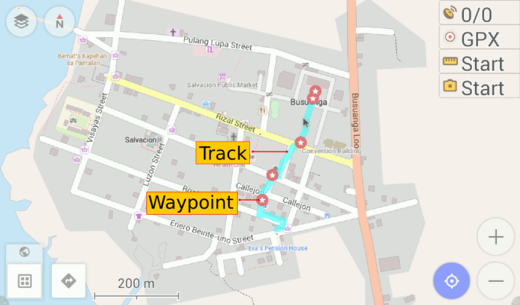
Below is an example of how tracks and waypoint look like on a map. The track is displayed as lines in cyan, and waypoints are white stars inside a red dot.
Exporting GPX tracks to OpenStreetMap editorWhen you are done collecting field data, you may import the GPX tracks for use in JOSM iD or another OpenStreetMap editor. Connect your Android device to a computer (using a data cable, Bluetooth, or an Internet connection) and copy the GPX tracks and (and perhaps, multimedia files) you’ve captured. In your device storage, look for the GPX track under folder /osmand/tracks, and the multimedia files /osmand/avnotes. Using the GPX tracks with the JOSM and iD editors are easy as dragging the files and dropping them into the application (or the browser tab, for iD).
Using OsmAnd with FieldPapers and JOSMFieldPapers is one of the favorite, “low-tech” tools used by many mappers. Here is the LearnOSM training material for FieldPapers.
The GPX track is now visible on the OsmAnd map canvass. SummaryExcellent! You could now make use of a smartphone for collecting field data that you may add to the OpenStreetMap database, as an alternative to dedicated GPS receivers. The wide availability of smartphones with GPS (and/or GLONASS) chips open new opportunities for collecting and updating OpenStreetMap data by casual mappers. Take some time to practice and familiarize yourself with the app before working with live data. This section introduced the concept of using OsmAnd for collecting GPX tracks, modifying or deleting POIs, including adding, commenting or closing Notes/Bugs, and how to transfer these files to a PC. Official OsmAnd DocumentationAdditional reference materials are available from the help section of OsmAnd’s website. Details about the legend in use in the default map style, is in their Extended Online Knowledge Base.
Was this chapter helpful?
Let us know and help us improve the guides!
|