OSMTracker
Reviewed 2016-02-08
This article relates to OSMTracker for Android - there is a similar product available for windows mobile.
OSMTracker allows the creation of a gpx trace of a journey, with the collection of ‘waypoints’ along the route. Voice recording, photographs and other notes may also be recorded, and all will be geolocated.
Quick Start
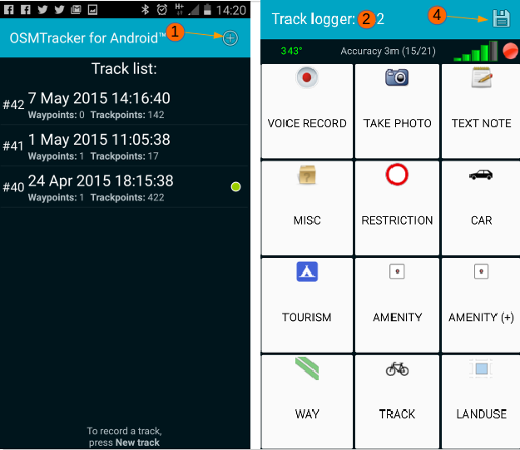
- Click on the cross to create new track.
- Screen will change to show the buttons - wait until they are no longer greyed out, which indicates the GPS has a fix.
- Travel your route, pressing appropriate buttons when you are exactly at the feature to be mapped. You can also create voice recordings, take photographs and take notes using the buttons.
- When you’ve finished, press the floppy disk icon to save your track & waypoints.
- To convert the track to a gpx file, press & hold it in the list, then select the appropriate option.
- Transfer the track, pictures and recordings to your computer & read from them to update OSM.
Install OSMTracker
Install OSMTracker from the F-Droid.
OSMTracker Configuration
Start OSMTracker, and press the menu icon on your Android device, then select Settings.
- Voice record duration - your choice, but 30 seconds is used by the author.
- Enable sound - recommended to tick this box - emits a beep to warn you when voice recording starts and ends.
- Reset authentication. This button will be ‘greyed out’ until you have uploaded a .gpx file, and authorised OSMTracker to upload tracks to your OpenStreetMap account.
- GPS settings Which methods your Android device will use to determine the location. Recommended to set this to High accuracy and the device will then use GPS, Wi-Fi and mobile networks to estimate the location.
- Check GPS at startup When you start OSMTracker, if the GPS has been switched off, the programme will prompt you to turn it back on.
- Ignore GPS clock If ticked will use the devices internal clock instead of the time provided within the GPS signal.
- GPS logging interval Choose the period between the recording of the position - for best accuracy select 0 or 1, each of which results in a recording each second.
The frequency affects battery usage, however when using this app. your screen is likely to be on most of the time, the gps working, and you may be taking photographs and recordings as well - all of these will result in a heavy battery drain and it is recommended for extended usage to use the device with the power augmented.
- External storage (SD) directory Default is /osmtracker
Most recent Android devices will not allow the saving of data in an external microSD or SD card. Although referred to as ‘external storage’ the tracks etc will actually be recorded in /storage/emulated/0/osmtracker.
- One directory per track Recommended as this will result in all of the related voice recordings, photographs, text notes and the gpx trace all being stored in the same folder, named with the date and time of the gpx file creation.
- Filename for named tracks Options for you to choose from if you have a preference for the naming of the files.
- Accuracy in GPX file Recommended - will result in the waypoint name including a figure approximating the possible error range in metres. For instance Footpath (4.0m). This information can be extremely useful later when updating OSM, and deciding whether to move an existing feature to align with the new trace & waypoints.
- Use HDOP approximation Relates to additional calculations to improve the position accuracy (Horizontal Dilution of Precision).
- Export Compass Heading Defines if and how the compass data should be exported to the GPX file.
- Default photo source Generally you will take photo’s with the camera through this app., but you can chose to use photo’s already on the phone.
- Screen always on Select this if you are constantly clicking on buttons, taking photo’s, or making voice recordings - if you’re not, then leave it blank so you have to switch the screen on each time, which uses less battery.
- Main screen graphic theme Options to change the contrast & screen brightness if you are having problems viewing the buttons.
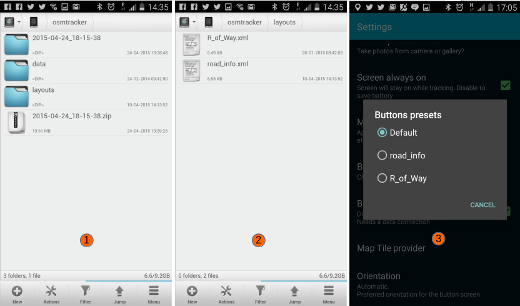
- Button Presets You can design & install your own set of buttons & choose to have them displayed using this option. For a full description of this function, see below.
- Background map By pressing and holding on a recorded track, if this feature is selected, you may display the track, and the app will download OpenStreetMap data as a background.
This does require a data connection to download the map. You do not need to use this function unless you wish to.
- Map Tile Provider If you’ve elected to download map data as a background when you display the map, you can choose which version of the map to use as a background.
- Orientation Do you want the screen to rotate, or use it in landscape or portrait?
The Track List
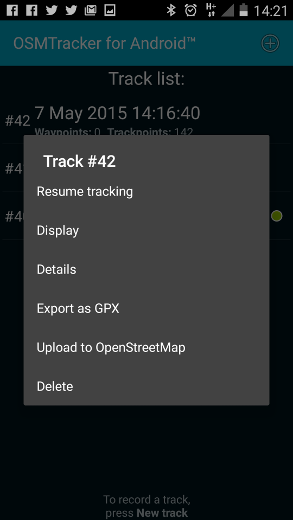
Having carried out your initial survey, clicking buttons, creating voice recordings and taking photographs, when you have finished, click on the floppy disk icon to end your track. Now press and hold the track in the list & options become available:
- Resume Tracking useful when you realise you’ve missed a bit!
- Display will show the track, possibly with a background map depending on your data connection and the option you selected in Background Map.
- Export as GPX - necessary for the track and waypoints to be used in an editing programme.
- Upload to OpenStreetMap Use this option to upload your trace to OpenStreetMap - you will need to have an OpenStreetMap account (How to obtain explained here), and will need to authorise this app to upload traces to your account. See GPS Traces - gpx files below for more information on why these traces are so important to OpenStreetMap.
Caution, do not delete your track yet. You have only uploaded the basic trace and not the waypoints, photographs etc. Retain everything until it is transferred to a computer for editing purposes.
- Delete. Self explanatory.
If you will be surveying for a particular reason, and the waypoint label you require is not available, you can create your own set of button presets prior to your surveying trip, load them into the phone and select them whilst surveying as & when you need them - several can be loaded in the phone & you may switch between them without stopping your recording. As the label you create is in the form of a personal note, it does not need to conform to the tags used within OpenStreetMap, and will not be uploaded to it. For instance, you may choose to have buttons labelled;
- 1 family,
- 2 families,
- 3 families,
- 4 families,
- chiefs house,
- 20% damaged,
- 40% damaged,
- 60% damaged,
- 80% damaged,
- destroyed,
- unsuitable for lorry,
- 4wd needed,
- etc..
For a full description on creating a button preset, see the OSMTracker wiki section. This is a sample download file.
Voice recordings, photograph & text image sizes
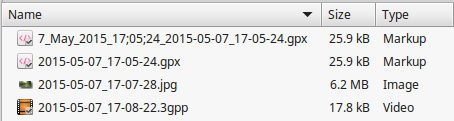
If file transfer at a later stage is an issue, be aware of the file sizes involved - as the screenshot shows photographs are very memory intensive compared to the gpx file or a 10 second voice recording.
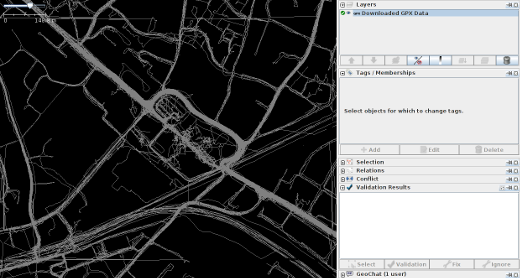
GPS Traces - gpx files
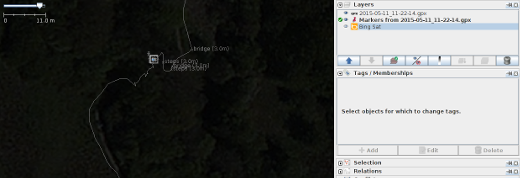
GPS traces in the form of gpx files are made up of a number of elements, principally a ‘trace’ and ‘waypoints’. The screenshot above shows a folder contents created in OSMTracker which has been loaded into JOSM ready for editing, with satellite imagery loaded to assist. The square icon in the centre of the trace indicates there is a photograph, taken at this location, available - simply click on the square icon to display the photograph.
If you are navigating and using a GPS to give you directions, you will notice at some point that it will ‘recalculate’. This is normally because its internal GPS location does not correspond to where it expects the road or path to be - there is a margin of error, but it is easy for roads and paths to be created in slightly the wrong place, or for the road to be moved after the map data has been created.
Volunteers updating OpenStreetMap can download all of the traces that have been uploaded in an area, and use them to:
- Trace roads & paths through areas that could not be seen with satellite imagery because of clouds, trees, shadows, buildings etc..
- Adjust the satellite imagery so that it aligns correctly - there can be a surprising variation with some imagery.
Although a single gpx trace is very useful, it may not be particularly accurate and can be as much as 30 metres out of place. When there are several traces, the correct route of the path or road is now easy to see - for example see the screenshot below showing a download of gpx traces in a town, in which the main roads can be seen by the volume of traces.