Tasking Manager Mapper Guide
If the user interface of the version you use looks different from the one described here then you should consult our version overview
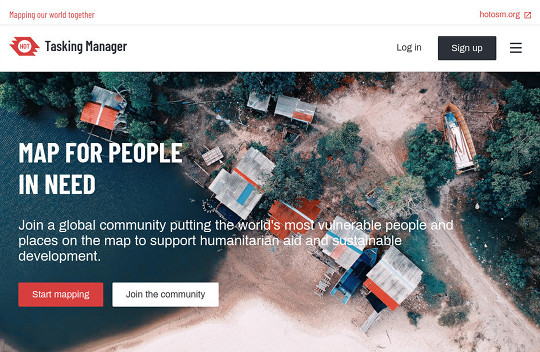
The Tasking Manager is the most popular tool to team up and coordinate mapping on OpenStreetMap.
OpenStreetMap.org is a collaborative, crowd sourced, free map of the world. Anyone can contribute to OpenStreetMap to map any part of the world that interests them.
You can use the widely used HOT Tasking Manager to get started mapping immediately for humanitarian organizations and their work in the field.
The Tasking Manager is one software in the whole OpenStreetMap ecosystem. When you are contributing to OpenStreetMap using the Tasking Manager, you are actually using multiple software tools:
- OpenStreetMap.org - A database of geographic information
- The Tasking Manager - The tool to coordinate collaborative mapping on OpenStreetMap data in the same area
- An OpenStreetMap Editor - A software program that can read and write data into the OpenStreetMap database

The role of the Tasking Manager is to present a specific geographic region and divide it up into small mapping areas called “tasks”. These can be locked by a mapper to avoid that other contributors map the same objects, introduce duplicated data or run into conflicts. Once mapping is complete in this small area the mapper reports back to the Tasking Manager that it is finished. And the mappers can select a new task to continue their contribution to OpenStreetMap.
Experienced mappers are going to check each of the tasks and make sure the quality of the data introduced in OpenStreetMap is acceptable. Eventually they would mark the task as validated or give it back to the mappers with instructions on how to improve.
Quick Start Guide
- Do you have an OpenStreetMap account already? You can skip ahead to step 4. Otherwise click on the
Sign up button in the upper right corner of the Tasking Manager homepage.
- You will be asked to provide a name and an email address.
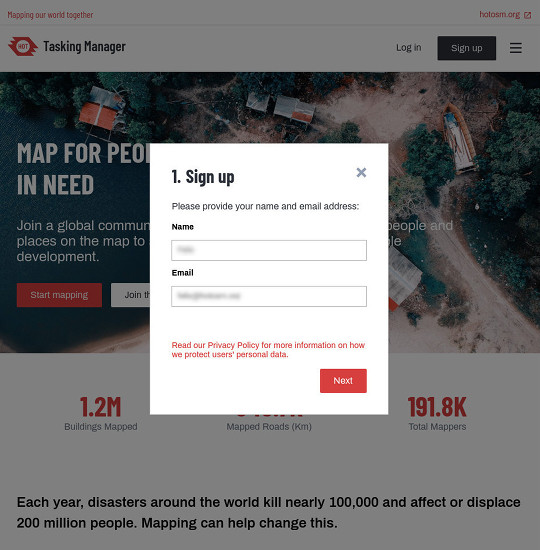
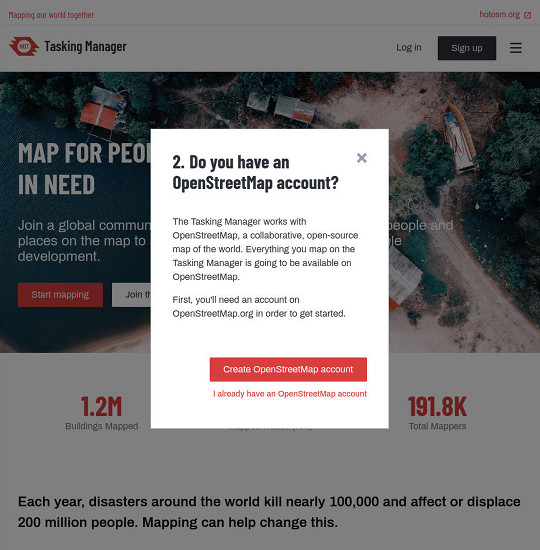
- A new tab will open allowing you to register on OpenStreetMap.org. Provide your account information and press the
Sign up button at the bottom of the form.

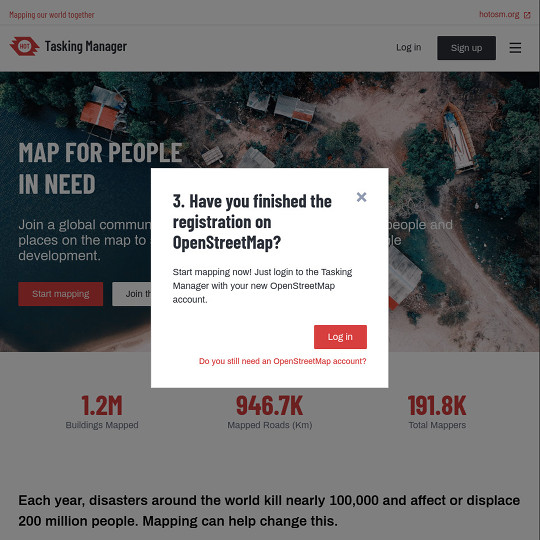
- Close the tab and go back to the Tasking Manager. Click the button to
Log in.
- Select
Explore projects in the main navigation to find a project to map on.
- Read the introduction to the project and click on
Contribute to begin with a mapping task.
- Map a randomly selected task for mapping by clicking on the button
Map a task.
 Alternatively, you can also select one task from the map and choose
 Map selected task.
- This opens the editor; map all the features asked for in the instructions.
- When finished mapping, save your edits, optionally leave a comment and select the button
Submit task.
 After this, you can go back to step 7 and select a new task for mapping. Thank you for your contribution to OpenStreetMap!
Mapping Process
- A remote mapper creates an account in OpenStreetMap and logs into the Tasking Manager.
- The mapper finds a project to work on, usually based on priority and skill level set by a Tasking Manager project manager.
- A remote mapper selects a task square, completes the mapping, and marks the task as complete.
- A second remote mapper checks that the task is completed to a satisfactory level and marks the task as ‘validated’
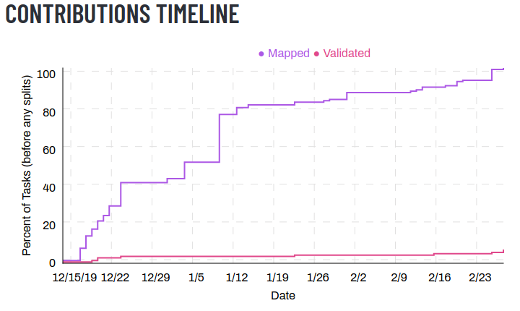
- Progress of the mapping of the project can be monitored from the Contributions Timeline graph at the bottom of the project information page. The project can be downgraded or archived as required by an administrator.
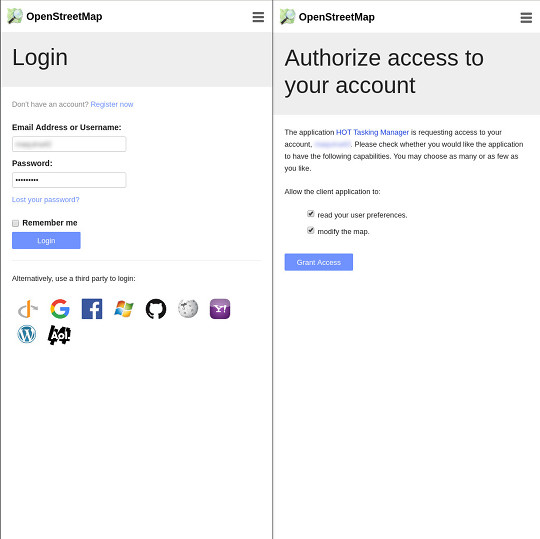
Tasking Manager Login
The Tasking Manager is a special tool that coordinates mapping in OpenStreetMap. It makes use of the OpenStreetMap login system. This means that you do not need to create a separate user account to use the Tasking Manager, but you do need to create an OpenStreetMap account and login to OpenStreetMap.org before you can use the Tasking Manager for mapping.
When you visit the Tasking Manager homepage you can choose between the Login and the Sign up button in the upper right corner of the screen.
- In case you already have an OpenStreetMap account, press
Log in. See also the QUICK START GUIDE step 4 and further.
- If you don’t have an OpenStreetMap account yet, choose
Sign up. Provide your email address and name and confirm.
See also the QUICK START GUIDE step 1 to 3.
Settings
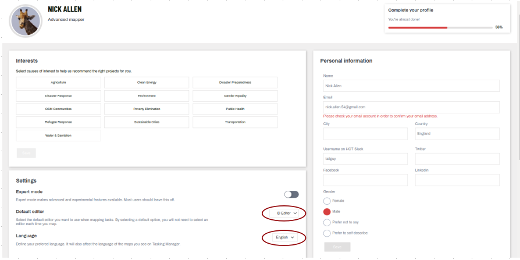
The Task Manager initially displays in English - to change to another language click on English. From here you can also;
- Click to view messages and notifications sent to you
 icon, top right.
- View your Tasking Manager profile
- Update your email address and social media handles
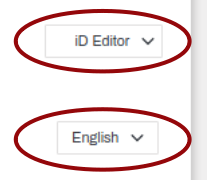
- Select your preferred mapping editor
- View your mapper experience level
- Select the types of projects you are mainly interested in
- Choose which notifications are sent to you
- Logout
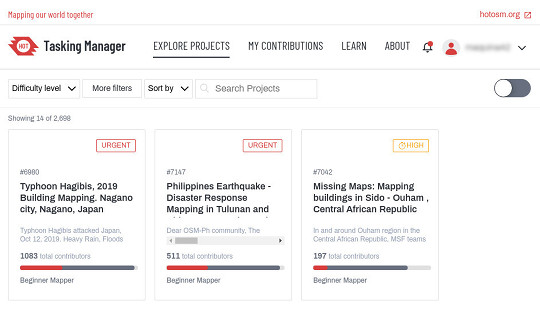
Find a Project
 The
The Start mapping button on the homepage will take you to the main list of projects in the Tasking Manager. Or simply select Explore projects in the main navigation.
The Tasking Manager Project list screen is divided into four main areas:
- Search and Filter options
- Download CSV link
- View Projects
- Scrollable Project List
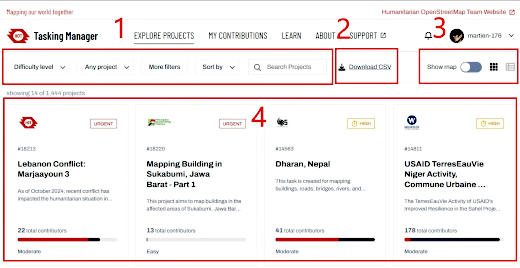
Search and Filter Options
By default all the projects available for mapping are displayed. You can use the Search filters section of the screen to further narrow down the projects that you would like to work on.
- Search Projects - If you know the number of the project you want to work on, you can enter it in ‘Search Projects’ and be taken directly to it. You can also search on text from within the project description.
- Difficulty level - Some projects are more difficult to map than others. This option allows you to find projects that are most appropriate for your experience level. You are encouraged to work on projects that best match your experience level, especially if you are a more experienced mapper.
- Any project - You can filter on a project to map or to validate. Also archived projects can be filtered here
- More filters - allows you to filter by
- Campaign
- Organization
- Location
- Interests
- You can also sort the resulting list
Download CSV link
Users can download project data as a CSV file, enabling them to conduct in-depth analysis, reporting, or further processing in external tools.
View Projects
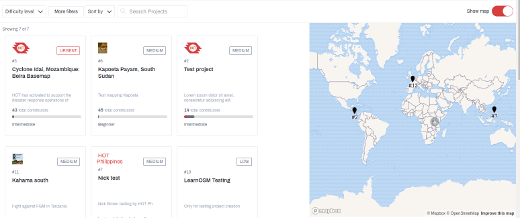
If you choose to show the map, you can view a map of the world showing where the projects are, or a disk indicating the number of projects in an area. Zoom in for more details, and you can select a project by clicking on its link from the map.
You can also toggle the view of the Scrollable Project List. Choose between tile view or list view.
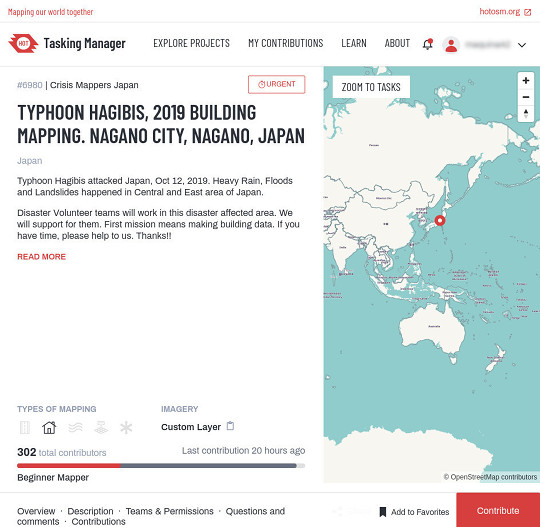
Project overview page
 Once you have located a project of your interest, clicking on it will take you to the overview page for that project. Read the description carefully and scroll down for more information, such as the organization who coordinates the mapping for this project, who can map or validate, any comments about the project, a progress graph and the list of contributors.
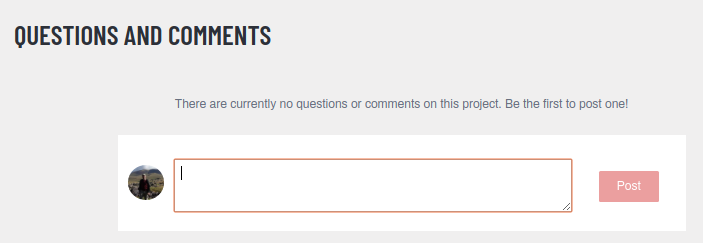
In the Questions and Comments section you can write and read about questions and comments concerning the project as a whole. The trashcan icon next to the comment box lets you delete a message you wrote.
Icons indicate the types of mapping, such as:
- Roads: Often used for routing on navigation devices.
- Buildings: Can be used to understand where people live and might be impacted.
- Waterways: Useful for damage assessment or contact tracing with diseases.
- Land use: Understand the purpose of land is part of a comprehensive map.
- Other: Any other kind of mapping.
Near the bottom of this page you find a list of projects that are similar to the project you are viewing.
 The
The Contribute button on the bottom right takes you to the screen where you can read the mapping instructions and select the tasks to work on.
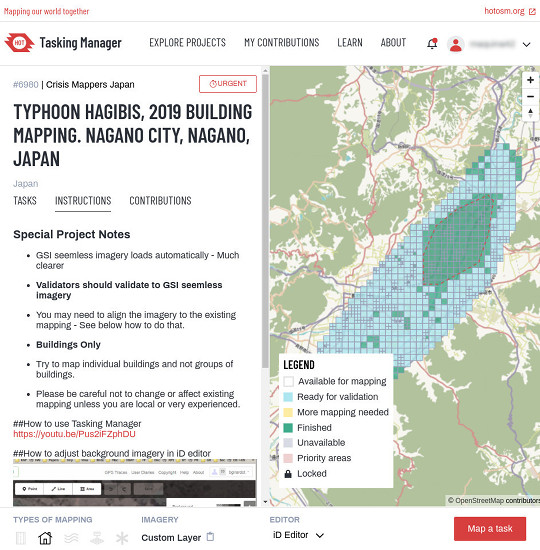
Project tasks page
This is your main screen for working on a project. The screen is divided into two parts.
The left section is a tabbed panel with tabs for:
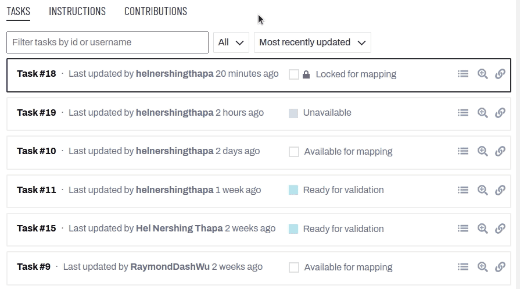
- Tasks A list of tasks which can be filtered according to ‘All’, ‘Available for mapping’, ‘Ready for validation’ or ‘Unavailable’.
- Instructions see Task Instructions below for more information. Make sure you read and understand all of the information before you start mapping.
- Contributions contains a record of the contributions done by fellow mappers on this project.
Other features
- Not all areas of the world are similar to your own, so specific tagging advice may be provided. For example, Africa’s road network is very different from typical American or European highway systems.
- There will be a section indicating the Changeset comment. You should make sure that it appears in your editing programme when uploading/saving your changes together with the source information you may (depending on your editing software) need to copy & paste to the source field on making changes.
- Sometimes, task specific imagery may be available - you may need to agree to a license in order to access it. Instructions usually will indicate the easiest way to load this into editors such as JOSM or iD.
- When checking a task marked as complete, validators will expect that the requirements from the instructions tab have all been completed. You may find completing an entire task is quite difficult - guidance below is available around unlocking tasks as well as providing useful feedback for the next mapper.
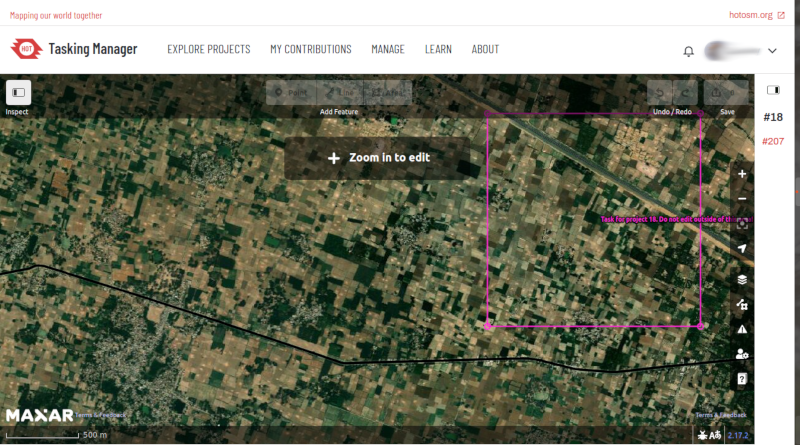
The right side of the screen is a map showing the tasks (often squares) coloured according to their status. Tasks that are available to you can be selected by clicking on them.
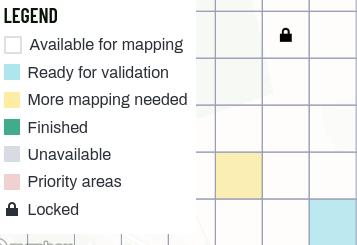
- The uncolored tasks are ready and available for mapping
- Pale blue - ready for validation
- Yellow - more mapping needed
- Green - mapped and validated - no more work needed
- Grey squares are not available
- Pink squares represent priority areas, and
 are locked by another mapper
Although you may have set your preferred editor within your preferences page, you do have the option of changing editor just for the task you are about to select.
Choice of Editors
Different options for editing are presented to you as soon as you lock a task.
Edit with JOSM
Start JOSM before using this link and it will automatically load the existing OSM data into JOSM.
- ‘Enable remote control’ needs to be ticked - found under Edit / Preferences / Remote Control
- If you have previously installed the plug-in ‘continuosDownload’ it is best to disable it (untick ‘Download OSM Data continuously’ under the File menu in JOSM).
- If JOSM does not load the imagery automatically as well, it can normally be found under the Imagery menu. More info on imagery here
iD editor
Select this to automatically start the OpenStreetMap iD editor within the Task Manager of your web browser, with existing OSM data loaded. The Internet Explorer web browser does not currently support iD.
Potlatch
From 2010 to 2020, Potlatch (version 2) was available as an online editor on openstreetmap.org via the Flash Player. Version 3 is a port to run under the desktop AIR environment.
For more information see https://github.com/systemed/potlatch3#Potlatch.
Field Papers
For use only when you are involved in a project where a local mapper has carried out a ground survey and marked a printed map with information such as road names. This map can be rescanned and used as a background image for a remote or local mapper to read the information and update the OpenStreeetMap data Field papers section of LearnOSM.
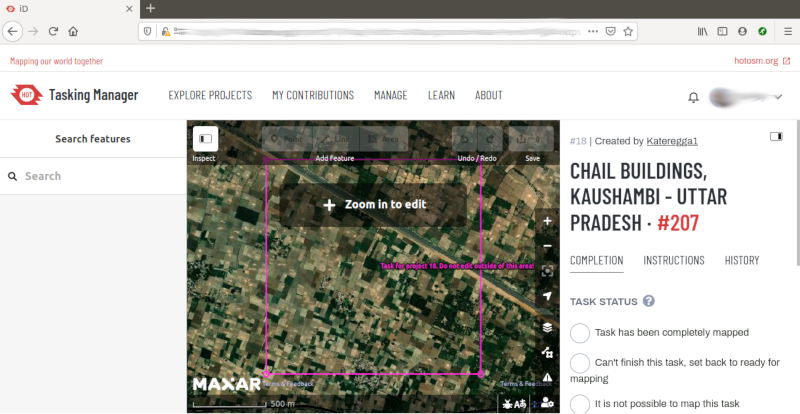
Select a task to map
 The button
 Map a task will lock a random task for you, and is the best option to choose when mapping at a Mapathon, or when a large number of people are working on a project at the same time.
There may be situations where you prefer to make your personal task selection using the map. You can make a pre-selection based on the task status by clicking the dropdown menu with the text “All”.
In either case you will reach the stage where your task is locked, and your 2 hour countdown timer has started.
Tip - Make a note of your start time, so that the square does not become unlocked accidentally while you are still working on it. If it does, and another mapper selects it and starts mapping you are very likely to have problems later with conflicts (Two mappers have edited the same object, and the OpenStreetMap database prevents you uploading your work until you indicate which persons work is correct). For more information on conflicts or in our HOT Tips Section. If you are mapping using JOSM, see JOSM conflict resolution.
 Once you have locked your Task, and your square (Task) boundary shown. You can still click on the tabs for:
- COMPLETION where you will later indicate why you have left this task, such as you have completed the required mapping, or you were unable to finish it for some reason - make sure you leave a message indicating why, such as “ Run out of time, I’ve done all of the top half of the square, but there is a lot more to be done in the bottom half “ before you select Select another Task.
- INSTRUCTIONS where you can refer to the task instructions again, if you cannot remember some details, perhaps about tags to use for certain features, or what to do about imagery, before you continue with your mapping.
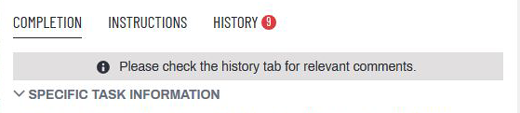
- HISTORY before starting to map, please always first read the comments under this tab. This is useful to check in case there is a comment from a previous mapper, such as that they have completed the top of the square only, and you need to concentrate on the lower half. You can see that there are comments if there is a number in a red circle next to the tab. Possibly you also see a warning ¨Please check the history tab for relevant comments¨.
Just to confirm - Clicking on the Start Mapping button, or locking your square from the map, locks the task so that no other mapper can select it until it is released again, and starts a 2 hour (120 minute) countdown timer, at the end of which time the task is automatically released. It is easy to become engrossed in your mapping and not realise your task has been released, and has now been selected by another mapper who has started mapping it too. This can lead to conflicts and problems.
Tip When editing with the iD editor within the Tasking Manager, use ‘Full screen’ to make your editing area larger. Depending on your operating system and web browser, this may be obtained using the F11 key, another key combination, or be obtained from the menu of the web browser.
Splitting a task square
Having selected your task and inspected it with the imagery in place, you may realise that there is far too much detail required for mapping. An example of this may be tracing buildings in dense urban areas, or locating small villages in large areas. As guidance, where it isn’t possible for one person to complete within the 2 hour time limit you can often split the task into 4 smaller areas. Use with caution - if/when task squares are split too small it is difficult to judge what type of highway is involved, and to identify other features.
Be aware that other useful comments about the work previously completed will no longer be available.
Submit your mapping task
Unlocking a Task before it is complete
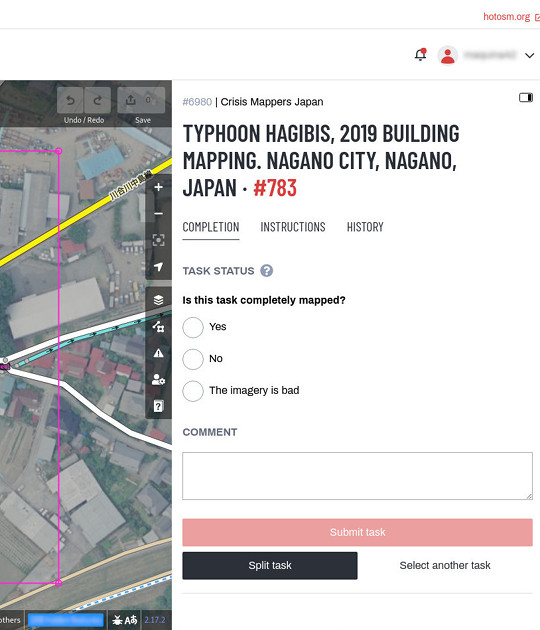
If you start working on a task, but cannot complete it for some reason, it is best practice to leave a comment in it. Simply detail what remains and choose No to the question “Is this task completely mapped?” and press Submit task. Make sure your comments are relevant and aimed to help out the next mapper.
For example:
Almost complete, small village top left
in the task square to be traced though
If you didn’t map at all, you can just go back without leaving any comment by choosing Select another task.
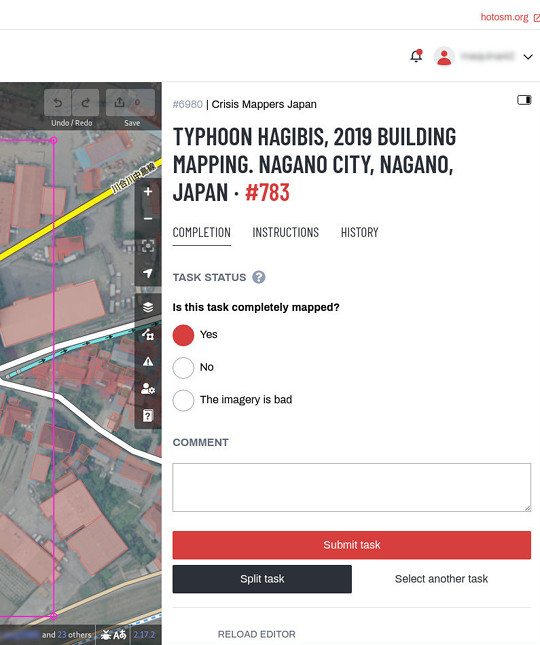
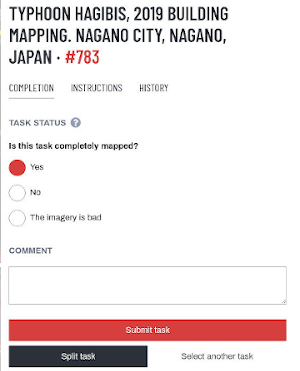
Submit a task that is completely mapped
Once you are done you can save all changes to OpenStreetMap:
- Answer the question “Is this task completely mapped?” with
Yes
- Add a comment to the text area detailing what you achieved and more importantly, what you are not certain of. For example: “Complete as far as I can see, but there is cloud covering the top right corner of the task & I cannot see to trace this area”.
- In a comment it is possible to address specific mappers by starting with @, following by an OSM user name. Add #contributors, #author or #managers to address these.
- Click on the
Submit task button, and your work is ready for review.
It is very difficult to be completely certain that you have completed a task - however it is acceptable to mark the task as complete if you are fairly sure - the contents will be checked by another mapper when validating, and any small additions can be made then.
Marking a Task as Bad Imagery
You will sometimes select a task that can not be mapped because the imagery is low resolution or has cloud cover. Check if alternative imagery gives you better results.
If that is not the case indicate The imagery is bad and confirm by clicking Submit task.
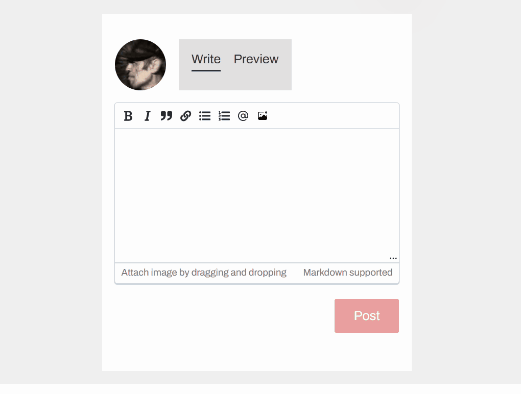
You can use Markdown to format your text, e.g. create paragraphs or add a list. There is also the possibility to insert images by drag and drop.
The comment box contains a toolbar with buttons to format your text. It produces Markdown templates that you can (sometimes must) adapt to your needs. The preview tab is for now only available on the general project QUESTIONS AND COMMENTS section.
When leaving a comment against a task, you can have the comment sent as a message to a named mapper. Much like Twitter, simply use an @ followed by the username. This will send a message to the user containing the comments from this box, plus a link to the task that the comments box relates to.
For example:
@HOTMppr nice work tracing the building details here.

There are a few minor issues though:
* You missed a small group of houses on the upper left of the task square
* A road is untagged

It would be great if you could fix it. Thanks for mapping.
This is particularly useful when validating or adding on another’s previous work - you can provide feedback, thanks or more.
Getting help
E-Mail
For questions which might require a little research to answer or more detailed explanations, usually the best channel is to write to mapper-support@hotosm.org
Live text based help
- Sign up at slack.hotosm.org. This will require filling in a form and might take a while to be accepted.
- Join the mapper-support channel
Using the “Comments” tab for the project you can see other users’ questions and comments and leave one of your own.
All comments are public and it is not live chat. Use the Slack option above if you need immediate attention.
Editing hints and tips
By now you have a good understanding of what the Tasking Manager is, and some of the various functions it supports. Unlike normal editing, this tool is often used for time critical projects with many participants - this may be a little bit different to what you are used to.
Some general advice to heed when working in this tool:
- Avoid mapping far outside of your task square - other mappers may be working in that area, resulting in duplicated efforts. It’s OK to map objects such as buildings overlapping a boundary, but avoid going much further - upload immediately after mapping something at the border.
- Extend roads, streams, or other features slightly over the boundaries - this lets the next mapper pick up where you left off, but upload as soon as you finish editing it.
- If you are in doubt about what a particular feature is, use the comment section to ask questions or check the wiki.
- If you make a serious mistake - for example, deleting a major feature or relation - use IRC or the comment box to ask other mappers to help in reverting this for you. Try to include the changeset, project and tasknumber, or a description of what happened. Being a collaborative task, many other mappers are here to help - it’s important to remember everyone makes mistakes sometimes.
- Don’t hesitate to ask for feedback - mappers validating your work can be terse or to the point, but if they know it’s OK to engage in a dialog with you, the outcome is often a lot better for all involved. It can be difficult to communicate in another language, and it’s easy to appear abrupt when you have to translate as well as pass a message in a language you are not fluent in.
- You must not validate your own work - a second pair of eyes will always lead to better quality mapping.
- Don’t worry if other mappers are terse when validating your work - like you, they just want to ensure all of the data is mapped accurately. Feedback is invariably about the remaining work, not criticism of your efforts to date.
Validation
Validation is the process of an experienced mapper reviewing the mapping of the initial mapper of a project task. It is designed to confirm that the mapping is complete and the quality of the data is good. It is also there to give encouragement to mappers by thanking them for their time, confirming that their mapping is good or giving instructions on how to improve their mapping.
More details can be found in a guide of its own
